
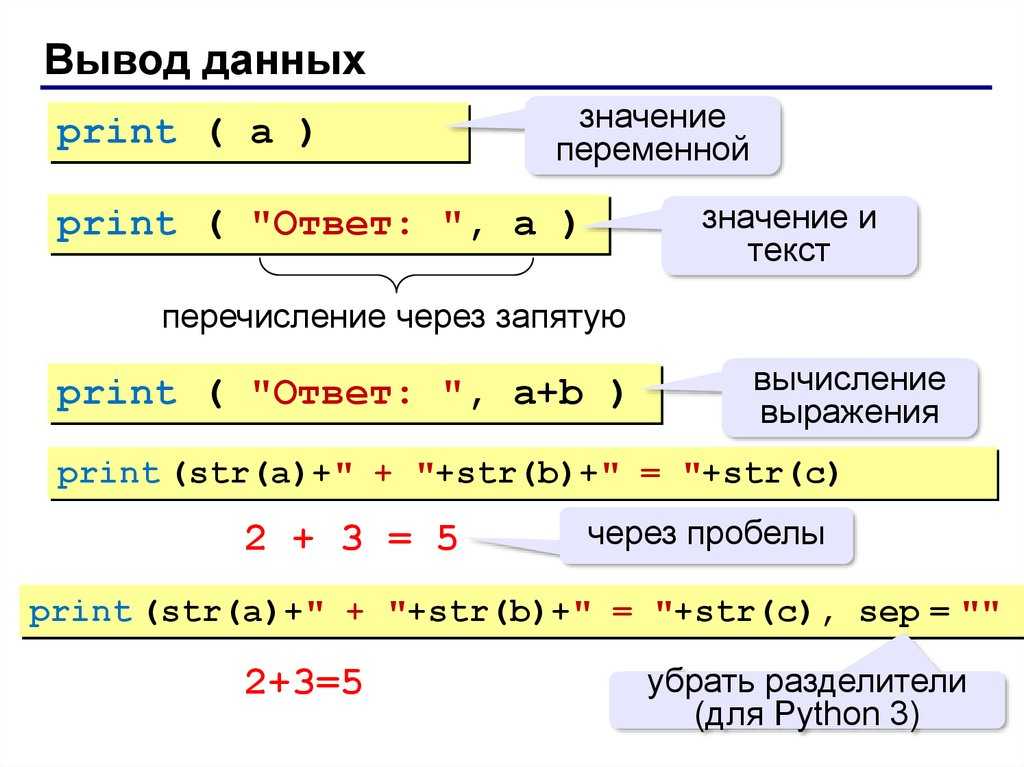
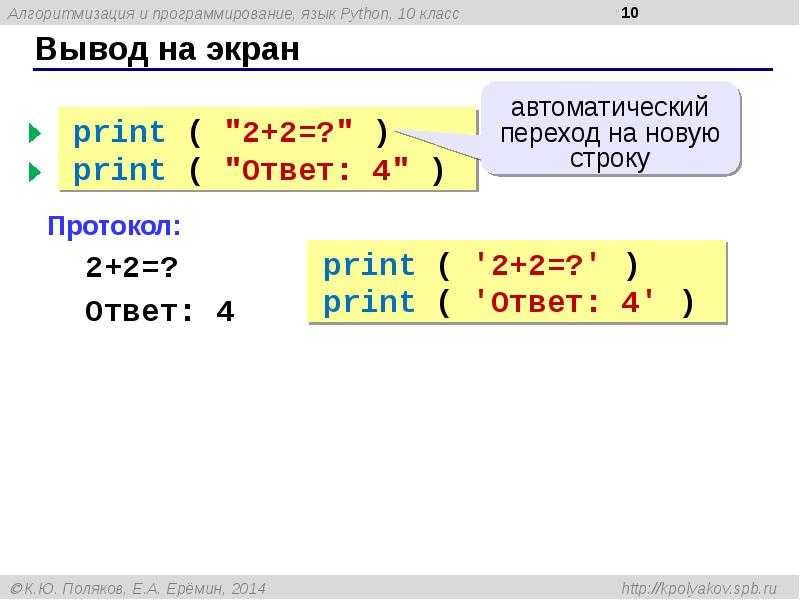
System Prerequisites
We will use Python 3 and Jupyter Notebook to demonstrate the code in this tutorial.In addition to Python and Jupyter Notebook, you will need the following Python modules:
- matplotlib – data visualization
- NumPy – numerical data functionality
- OpenPyXL – read/write Excel 2010 xlsx/xlsm files
- pandas – data import, clean-up, exploration, and analysis
- xlrd – read Excel data
- xlwt – write to Excel
- XlsxWriter – write to Excel (xlsx) files
There are multiple ways to get set up with all the modules. We cover three of the most common scenarios below.
- If you have Python installed via Anaconda package manager, you can install the required modules using the command . For example, to install pandas, you would execute the command – .
- If you already have a regular, non-Anaconda Python installed on the computer, you can install the required modules using . Open your command line program and execute command to install a module. You should replace with the actual name of the module you are trying to install. For example, to install pandas, you would execute command – .
- If you don’t have Python already installed, you should get it through the Anaconda package manager. Anaconda provides installers for Windows, Mac, and Linux Computers. If you choose the full installer, you will get all the modules you need, along with Python and pandas within a single package. This is the easiest and fastest way to get started.
Writing Pandas Dataframes to Excel
Excel files can, of course, be created in Python using Pandas to_excel method. In this section of the post, we will learn how to create an excel file using Pandas. First, before writing an Excel file, we will create a dataframe containing some variables. Before that, we need to import Pandas:
The next step is to create the dataframe. We will create the dataframe using a dictionary. The keys will be the column names and the values will be lists containing our data:
In this Pandas write to Excel example, we will write the dataframe to an Excel file using the to_excel method. Noteworthy, when using Pandas to_excel in the code chunk below, we don’t use any parameters.
In the Excel file created when using Pandas to_excel is shown below. Evidently, if we don’t use the parameter sheet_name we get the default sheet name, ‘Sheet1’. Now, we can also see that we get a new column in our Excel file containing numbers. These are the index from the dataframe.
If we want our sheet to be named something else and we don’t want the index column we can add the following argument and parameters when we use Pandas to write to Excel:
Writing Multiple Pandas Dataframes to an Excel File:
In this section, we are going to use Pandas ExcelWriter and Pandas to_excel to write multiple Pandas dataframes to one Excel file. That is if we happen to have many dataframes that we want to store in one Excel file but on different sheets, we can do this easily. However, we need to use Pandas ExcelWriter now:
In the code above, we create 3 dataframes and then we continue to put them in a dictionary. Note, the keys are the sheet names and the cell names are the dataframes. After this is done we create a writer object using the xlsxwriter engine. We then continue by looping through the keys (i.e., sheet names) and add each sheet. Finally, the file is saved. Note, the final step is important as leaving this out will not give you the intended results.
Of course, there are other ways to store data. One of them is using JSON files. See the latest tutorial on how to read and write JSON files using Pandas to learn about one way to load and save data in the JSON format.
More resources on how to load data in different formats:
- How to read and write CSV files using Pandas
- How to read and write SPSS files using Python
Conclusion
Pandas is not a replacement for Excel. Both tools have their place in the data analysis workflow and can be very great companion tools. As we demonstrated, pandas can do a lot of complex data analysis and manipulations, which depending on your need and expertise, can go beyond what you can achieve if you are just using Excel. One of the major benefits of using Python and pandas over Excel is that it helps you automate Excel file processing by writing scripts and integrating with your automated data workflow. Pandas also has excellent methods for reading all kinds of data from Excel files. You can export your results from pandas back to Excel too if that’s preferred by your intended audience.
On the other hand, Excel is a such a widely used data tool, it’s not a wise to ignore it. Acquiring expertise in both pandas and Excel and making them work together gives you skills that can help you stand out in your organization.
Learn Data Skills
Get that next raise or to switch to a career in data science by learning data skills.
Sign up for a free account and try our interactive courses in Python, R, SQL, and more!
Sign up now!
(It’s Free)
Summary: How to Work With Excel Files using Pandas
That was it! In this post, we have learned a lot! We have, among other things, learned how to:
- Read Excel files and Spreadsheets using read_excel
- Load Excel files to dataframes:
- Read Excel sheets and skip rows
- Merging many sheets to a dataframe
- Loading many Excel files into one dataframe
- Load Excel files to dataframes:
- Write a dataframe to an Excel file
- Taking many dataframes and writing them to one Excel file with many sheets
Leave a comment below if you have any requests or suggestions on what should be covered next! Check the post A Basic Pandas Dataframe Tutorial for Beginners to learn more about working with Pandas dataframe. That is after you have loaded them from a file (e.g., Excel spreadsheets)
С этим читают
Simple Paralellization in Python with Joblib
Joblib is a simple Python library that allows you to run a function in //. In practice, joblib works as a list comprehension. Except each iteration is performed by a different thread. Here’s an example.
def loop(file_number): return pd.read_csv(f”Dummy {file_number}.csv”)df = Parallel(n_jobs=-1, verbose=10)(delayed(loop)(file_number) for file_number in range(10))#equivalent todf =
Think as joblib as a smart list comprehension.
Idea #5: Use Pickle Files
You can go (much) faster by storing data in pickle files — a specific format used by Python — rather than .csv files.
Con: you won’t be able to manually open a pickle file and see what’s in it.
start = time.time()def loop(file_number): return pd.read_pickle(f”Dummy {file_number}.pickle”)df = Parallel(n_jobs=-1, verbose=10)(delayed(loop)(file_number) for file_number in range(10))df = pd.concat(df, ignore_index=True)end = time.time()print(“Pickle//:”, end — start)>> Pickle//: 0.072
We just cut the running time by 80%!
In general, it is much faster to work with pickle files than csv files. But, on the other hand, pickles files usually take more space on your drive (not in this specific example).
In practice, you will not be able to extract data from a system directly in pickle files.
I would advise using pickles in the two following cases:
- You want to save data from one of your Python processes (and you don’t plan on opening it on Excel) to use it later/in another process. Save your Dataframes as pickles instead of .csv
- You need to reload the same file(s) multiple times. The first time you open a file, save it as a pickle so that you will be able to load the pickle version directly next time. Example: Imagine that you use transactional monthly data (each month you load a new month of data). You can save all historical data as .pickle and, each time you receive a new file, you can load it once as a .csv and then keep it as a .pickle for the next time.
Bonus: Loading Excel Files in Parallel
Let’s imagine that you received excel files and that you have no other choice but to load them as is. You can also use joblib to parallelize this. Compared to our pickle code from above, we only need to update the loop function.
start = time.time()def loop(file_number): return pd.read_excel(f"Dummy {file_number}.xlsx")df = Parallel(n_jobs=-1, verbose=10)(delayed(loop)(file_number) for file_number in range(10))df = pd.concat(df, ignore_index=True)end = time.time()print("Excel//:", end - start)>> 13.45
How to load excel files using parallelization in Python.
We could reduce the loading time by 70% (from 50 seconds to 13 seconds).
You can also use this loop to create pickle files on the fly. So that, next time you load these files, you’ll be able to achieve lightning fast loading times.
def loop(file_number): temp = pd.read_excel(f"Dummy {file_number}.xlsx") temp.to_pickle(f"Dummy {file_number}.pickle") return temp
Recap
By loading pickle files in parallel, we decreased the loading time from 50 seconds to less than a tenth of a second.
- Excel: 50 seconds
- CSV: 0.63 seconds
- Smarter CSV: 0.62 seconds
- CSV in //: 0.34 seconds
- Pickle in //: 0.07 seconds
- Excel in //: 13.5 seconds
Bonus #2: 4x Faster Parallelization
Joblib allows to change the parallelization backend to remove some overheads. You can do this by giving prefer=”threads» to Parallel.


Using prefer=”threads” will allow you to run your process even faster.
We obtain a speed of around 0.0096 seconds (over 50 runs with a 2021 MacBook Air).
Using prefer=”threads” with CSV and Excel parallelization gives the following results.
![]()
Formatting of the Dataframe headers
Pandas writes the dataframe header with a default cell format. Since it is a
cell format it cannot be overridden using . If you wish to
use your own format for the headings then the best approach is to turn off the
automatic header from Pandas and write your own. For example:
# Turn off the default header and skip one row to allow us to insert a
# user defined header.
df.to_excel(writer, sheet_name='Sheet1', startrow=1, header=False)

# Get the xlsxwriter workbook and worksheet objects.
workbook  = writer.book
worksheet = writer.sheets'Sheet1'

# Add a header format.
header_format = workbook.add_format({
    'bold' True,
    'text_wrap' True,
    'valign' 'top',
    'fg_color' '#D7E4BC',
    'border' 1})

# Write the column headers with the defined format.
for col_num, value in enumerate(df.columns.values):
    worksheet.write(, col_num + 1, value, header_format)
![]()
Exporting the results to Excel
If you’re going to be working with colleagues who use Excel, saving Excel files out of pandas is important. You can export or write a pandas DataFrame to an Excel file using pandas method. Pandas uses the Python module internally for writing to Excel files. The method is called on the DataFrame we want to export.We also need to pass a filename to which this DataFrame will be written.
By default, the index is also saved to the output file. However, sometimes the index doesn’t provide any useful information. For example, the DataFrame has a numeric auto-increment index, that was not part of the original Excel data.
| Title | Year | Genres | Language | Country | Content Rating | Duration | Aspect Ratio | Budget | Gross Earnings | … | Facebook Likes – Actor 2 | Facebook Likes – Actor 3 | Facebook Likes – cast Total | Facebook likes – Movie | Facenumber in posters | User Votes | Reviews by Users | Reviews by Crtiics | IMDB Score | Net Earnings | |
|---|---|---|---|---|---|---|---|---|---|---|---|---|---|---|---|---|---|---|---|---|---|
| Intolerance: Love’s Struggle Throughout the Ages | 1916.0 | Drama|History|War | NaN | USA | Not Rated | 123.0 | 1.33 | 385907.0 | NaN | … | 22.0 | 9.0 | 481 | 691 | 1.0 | 10718 | 88.0 | 69.0 | 8.0 | NaN | |
| 1 | Over the Hill to the Poorhouse | 1920.0 | Crime|Drama | NaN | USA | NaN | 110.0 | 1.33 | 100000.0 | 3000000.0 | … | 2.0 | 0.0 | 4 | 1.0 | 5 | 1.0 | 1.0 | 4.8 | 2900000.0 | |
| 2 | The Big Parade | 1925.0 | Drama|Romance|War | NaN | USA | Not Rated | 151.0 | 1.33 | 245000.0 | NaN | … | 12.0 | 6.0 | 108 | 226 | 0.0 | 4849 | 45.0 | 48.0 | 8.3 | NaN |
| 3 | Metropolis | 1927.0 | Drama|Sci-Fi | German | Germany | Not Rated | 145.0 | 1.33 | 6000000.0 | 26435.0 | … | 23.0 | 18.0 | 203 | 12000 | 1.0 | 111841 | 413.0 | 260.0 | 8.3 | -5973565.0 |
| 4 | Pandora’s Box | 1929.0 | Crime|Drama|Romance | German | Germany | Not Rated | 110.0 | 1.33 | NaN | 9950.0 | … | 20.0 | 3.0 | 455 | 926 | 1.0 | 7431 | 84.0 | 71.0 | 8.0 | NaN |
5 rows × 26 columns
You can choose to skip the index by passing along index-False.
We need to be able to make our output files look nice before we can send it out to our co-workers. We can use pandas class along with the Python module to apply the formatting.
We can do use these advanced output options by creating a object and use this object to write to the EXcel file.
We can apply customizations by calling on the workbook we are writing to. Here we are setting header format as bold.
Finally, we save the output file by calling the method on the writer object.
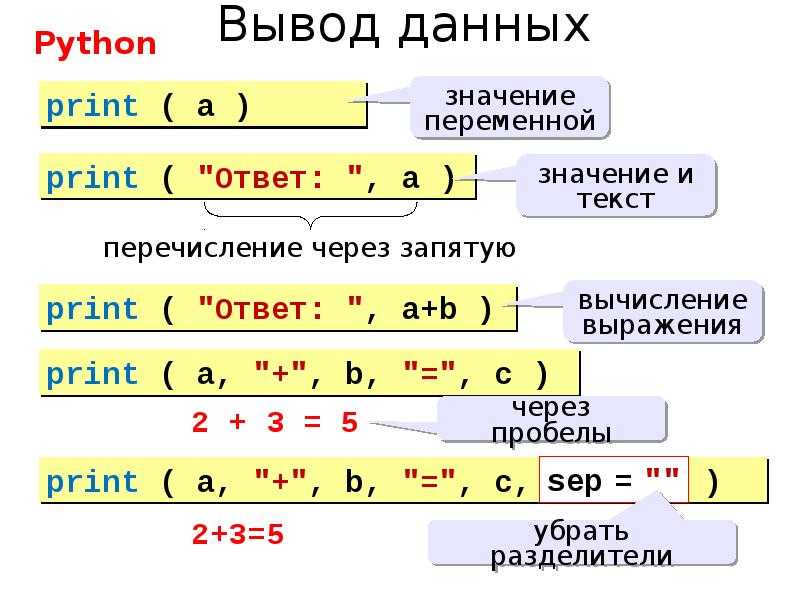
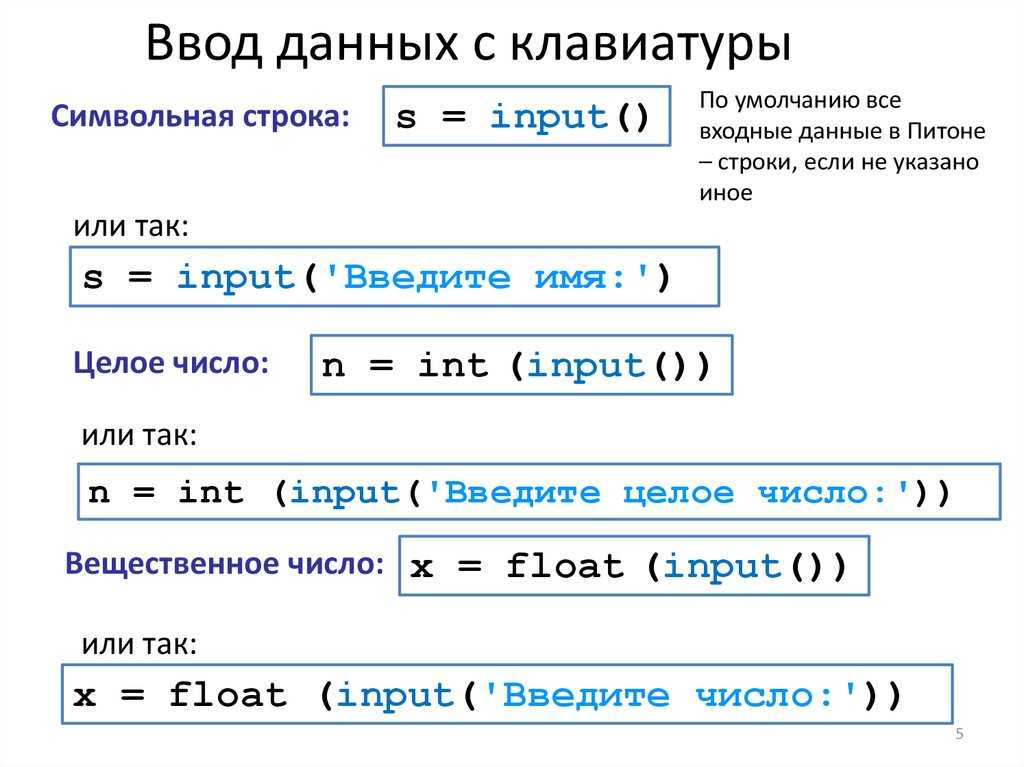
As an example, we saved the data with column headers set as bold. And the saved file looks like the image below.
![]()
Like this, one can use to apply various formatting to the output Excel file.
Открытие файла данных в Pandas
Хранение данных возможно в таблицах SQL либо в CSV-таблицах. Также есть вариант использования других форматов, в том числе, и Excel. Тем не менее, цель одинаковая. необходимо иметь структуру данных, которая будет совместимой с pandas.
Структуры данных в Python
Таких структур данных в Pandas есть две: Series и DataFrame.
Под первой подразумевается одномерная структура данных. В этом случае каждое значение имеет свой уникальный индекс.
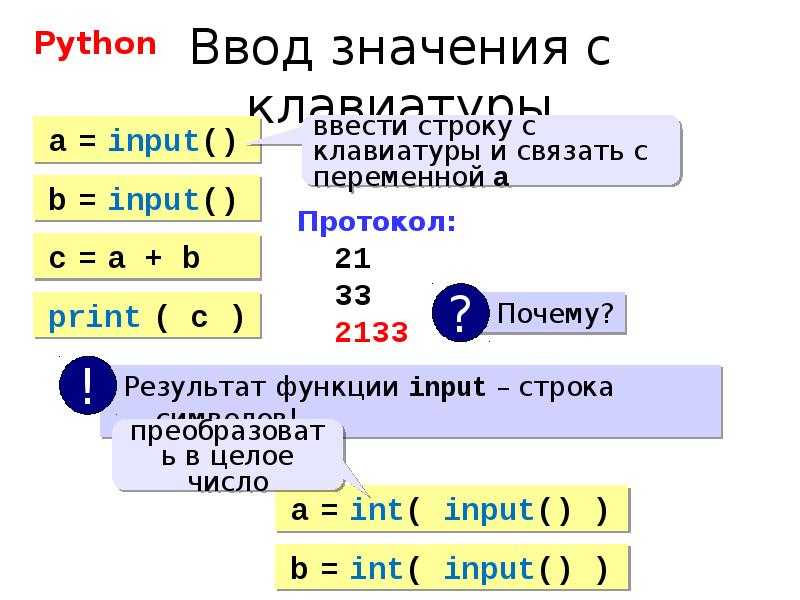
А DataFrame уже считается двухмерной структурой. Это означает, что она состоит из колонок и строк. Каждый столбец имеет свое имя, а строка – индекс.
Выглядит такая структура данных следующим образом.![]()
Сегодня мы более подробно будем рассматривать второй вариант. Почему? Дело в том, что обработку большей части информации значительно проще осуществлять в двухмерной структуре.
Как загрузить .csv-файл в DataFrame?
Чтобы это сделать, необходимо использовать функцию read_csv(). Давайте начнем с образца, называющегося zoo. В этом случае вам надо создать этот файл самостоятельно. Сырые данные следующие.
animal,uniq_id,water_need

elephant,1001,500

elephant,1002,600

elephant,1003,550

tiger,1004,300

tiger,1005,320

tiger,1006,330

tiger,1007,290

tiger,1008,310

zebra,1009,200

zebra,1010,220

zebra,1011,240

zebra,1012,230

zebra,1013,220

zebra,1014,100

zebra,1015,80

lion,1016,420

lion,1017,600

lion,1018,500

lion,1019,390

kangaroo,1020,410

kangaroo,1021,430

kangaroo,1022,410
Теперь вернем ко вкладке Home Jupyter, чтобы сгенерировать новый текстовый файл. ![]()
После этого выполняем копирование информации выше, чтобы вставить данные в этот файл.![]()
И в конечном итоге, называем его zoo.csv.
Это и будет первый csv-файл.
Теперь давайте вернемся в Jupyter Notebook с именем pandas_tutorial_1, чтобы открыть в нем этот файл. Чтобы это сделать, необходимо воспользоваться функцией read_csv().
Для этого вводим такую инструкцию.
pd.read_csv('zoo.csv', delimiter=',')
![]()
Все, теперь файл zoo.csv был перенесен в pandas и стал двухмерной таблицей DataFrame. Слева расположены индексы, а источником для названий столбцов вверху служит первая строка файла zoo.csv.
- Вернуться в Jupyter Notebook и указать следующую команду.!wget https://pythonru.com/downloads/pandas_tutorial_read.csvТаким образом будет загружен файл pandas_tutorial_read.csv на сервер. При клике по нем появляется возможность получить все данные из файла.
- Вернуться в Jupyter Notebook и применять ту же функцию read_csv (не забыв сменить название файла и разделитель).pd.read_csv(‘pandas_tutorial_read.csv’, delimete=’;’)После этого загрузка данных в pandas считается окончательно завершенной.
В итоге, у нас получится такая таблица.![]()
Здесь видим определенную проблему. На этот раз отсутствует заголовок, поэтому его настройку нужно выполнить самостоятельно. Для этого надо добавить в функцию параметры имен.

pd.read_csv('pandas_tutorial_read.csv', delimiter=';',

    names=)
![]()
Видим, что такой вариант лучше. Теперь файл .csv загружен в pandas DataFrame уже окончательно.
При этом есть и альтернативный метод. Загрузка файла с данными возможна и напрямую через адрес URL. В этом случае загрузки информации на сервер не будет.
А на практике это выполняется следующим образом. Напишите такой код.
pd.read_csv(

    'https://pythonru.com/downloads/pandas_tutorial_read.csv',

    delimiter=';',

    names=

)
Если вам интересно, что в этом наборе, то это набор информации о путешествиях из специализированного блога. Ну а о том, какие сведения хранятся в колонках, очевидно из самой таблицы.
Converting
Chances are that, while using Pandas, everyone else in your organization is stuck with Excel. Want to share the DataFrame with those using Excel?
First, we need to do some cleanup. Remember the byte order mark we saw earlier? That causes problems when writing this data to an Excel file — Pandas throws a UnicodeDecodeError. Why? Because the rest of the text is decoded as ASCII, but the hexadecimal values can’t be represented in ASCII.
We could write everything as Unicode, but remember this byte order mark is an unnecessary (to us) extra we don’t want or need. So we will get rid of it by renaming the column header:
This is the way to rename a column in Pandas; a bit complicated, to be honest. is needed because we want to modify the existing structure, and not create a copy, which is what Pandas does by default.
Now we can save the data to Excel:
Make sure to install XlsxWriter before running:
Объединение нескольких excel-файлов
Да, эту задачу можно решить ручками или power query, где несколько таблиц передаете в запрос и объединяете.
Например, на работе вы можете работать с ежемесячными отчётами о продажах, и с 90% вероятностью вы будете заниматься консолидацией региональных отчётов. Однажды вас попросят подготовить не только сконсолидированный отчёт, но и найти/подсчитать общее количество продаж по всем этим отчетам — и всё как можно быстрее.
Вариант номер 1, описан выше. Excel, Power Query, добавляете отчёты, объединяете, открываете, смотрите.
Вариант номер 2. Excel, несколько таблиц, переносим вкладки в один документ, создаете еще одну вкладку с шаблоном, делаете подсчёты с помощью формул. Смотрите.
А можно Вариант номер 3. Объединить все excel-файлы в python, используя библиотеку (да-да, pandas).
Устанавливаем используя или в терминале:
pip install pandas###conda install pandas
![]()
И рассмотрим вариант работы с отчетом, который сделан по одному шаблону (например, придумаем самый простеньких отчёт о продажах фруктов).
- Файл 1: https://github.com/asaydn/excel-python/raw/master/january.xlsx
- Файл 2: https://github.com/asaydn/excel-python/raw/master/february.xlsx
- Файл 3: https://github.com/asaydn/excel-python/raw/master/march.xlsx
Можно заметить, что наш отчёт начинается не с первой ячейки, а только с 4-й строчки, поэтому нам понадобятся данные для импорта, начиная с этой строки (мне кажется, здорово такоё вариант учесть, потому что в работе часто такое встречается). В приведенном ниже коде мы будем использовать функции и .
# часть перваяimport pandas as pdfiles = ['https://github.com/asaydn/test/raw/master/january.xlsx', 'https://github.com/asaydn/test/raw/master/february.xlsx', 'https://github.com/asaydn/test/raw/master/march.xlsx']merger = pd.DataFrame()# часть втораяfor file in files: df = pd.read_excel(file, skiprows = 3) merger = merger.append(df, ignore_index = True)# сохраняемmerger.to_excel('merger.xlsx')
Давайте посмотрим на то, что мы сделали здесь:
- В первой части мы импортировали , создали список со всеми url-адресами и сгенерировали пустой фрейм данных под названием
- Во второй части мы просмотрели каждый элемент списка (url-адрес) в , чтобы прочитать каждый файл, пропустив первые три строчки () и добавив его в объединенный датафрейм().
- В третьей части мы генерируем новый excel-файл с именем , содержащий наши объединенные файлы!
Визуализация данных в pandas
Для визуального анализа данных, pandas использует библиотеку matplotlib. Продемонстрирую простейший способ визуализации в pandas на примере с акциями Apple.
Берём цену закрытия в промежутке между 2012 и 2017.
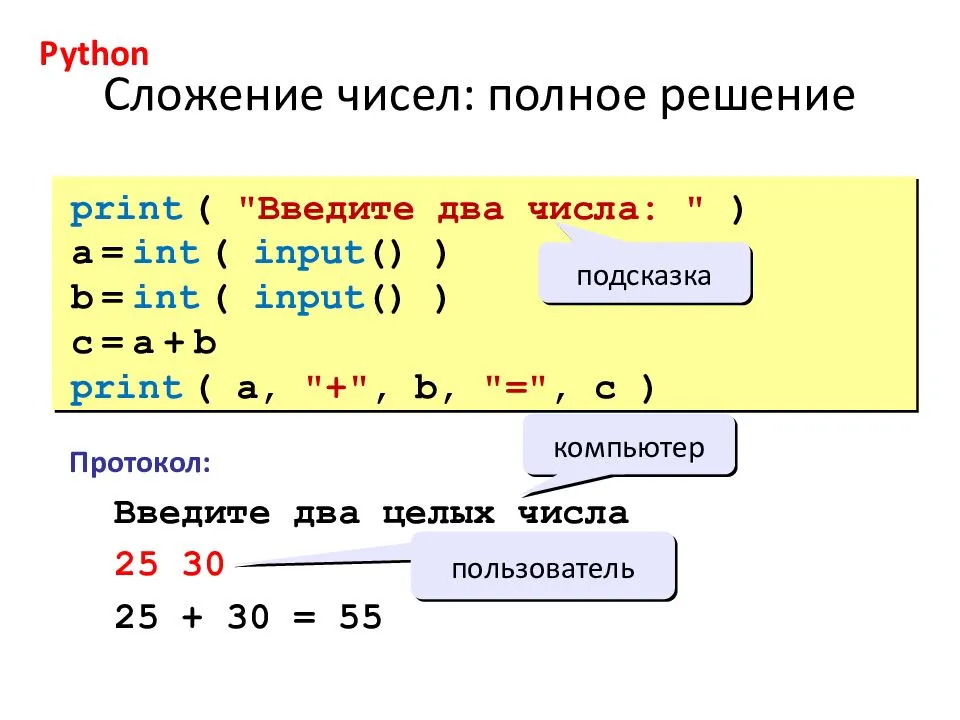
И видим вот такую картину:
![]()
По оси X, если не задано явно, всегда будет индекс. По оси Y в нашем случае цена закрытия. Если внимательно посмотреть, то в 2014 году цена на акцию резко упала, это событие было связано с тем, что Apple проводила сплит 7 к 1. Так мало кода и уже более-менее наглядный анализ ![]()
Эта заметка демонстрирует лишь малую часть возможностей pandas. Со своей стороны я постараюсь по мере своих сил обновлять и дополнять её.
Exploring the data
Now that we have read in the movies data set from our Excel file, we can start exploring it using pandas. A pandas DataFrame stores the data in a tabular format, just like the way Excel displays the data in a sheet. Pandas has a lot of built-in methods to explore the DataFrame we created from the Excel file we just read in.
We already introduced the method in the previous section that displays few rows from the top from the DataFrame. Let’s look at few more methods that come in handy while exploring the data set.
We can use the method to find out the number of rows and columns for the DataFrame.
This tells us our Excel file has 5042 records and 25 columns or observations. This can be useful in reporting the number of records and columns and comparing that with the source data set.
We can use the method to view the bottom rows. If no parameter is passed, only the bottom five rows are returned.
| Title | Year | Genres | Language | Country | Content Rating | Duration | Aspect Ratio | Budget | Gross Earnings | … | Facebook Likes – Actor 1 | Facebook Likes – Actor 2 | Facebook Likes – Actor 3 | Facebook Likes – cast Total | Facebook likes – Movie | Facenumber in posters | User Votes | Reviews by Users | Reviews by Crtiics | IMDB Score | |
|---|---|---|---|---|---|---|---|---|---|---|---|---|---|---|---|---|---|---|---|---|---|
| 1599 | War & Peace | NaN | Drama|History|Romance|War | English | UK | TV-14 | NaN | 16.00 | NaN | NaN | … | 1000.0 | 888.0 | 502.0 | 4528 | 11000 | 1.0 | 9277 | 44.0 | 10.0 | 8.2 |
| 1600 | Wings | NaN | Comedy|Drama | English | USA | NaN | 30.0 | 1.33 | NaN | NaN | … | 685.0 | 511.0 | 424.0 | 1884 | 1000 | 5.0 | 7646 | 56.0 | 19.0 | 7.3 |
| 1601 | Wolf Creek | NaN | Drama|Horror|Thriller | English | Australia | NaN | NaN | 2.00 | NaN | NaN | … | 511.0 | 457.0 | 206.0 | 1617 | 954 | 0.0 | 726 | 6.0 | 2.0 | 7.1 |
| 1602 | Wuthering Heights | NaN | Drama|Romance | English | UK | NaN | 142.0 | NaN | NaN | NaN | … | 27000.0 | 698.0 | 427.0 | 29196 | 2.0 | 6053 | 33.0 | 9.0 | 7.7 | |
| 1603 | Yu-Gi-Oh! Duel Monsters | NaN | Action|Adventure|Animation|Family|Fantasy | Japanese | Japan | NaN | 24.0 | NaN | NaN | NaN | … | 0.0 | NaN | NaN | 124 | 0.0 | 12417 | 51.0 | 6.0 | 7.0 |
5 rows × 25 columns
In Excel, you’re able to sort a sheet based on the values in one or more columns. In pandas, you can do the same thing with the method. For example, let’s sort our movies DataFrame based on the Gross Earnings column.


Since we have the data sorted by values in a column, we can do few interesting things with it. For example, we can display the top 10 movies by Gross Earnings.
We can also create a plot for the top 10 movies by Gross Earnings. Pandas makes it easy to visualize your data with plots and charts through matplotlib, a popular data visualization library. With a couple lines of code, you can start plotting. Moreover, matplotlib plots work well inside Jupyter Notebooks since you can displace the plots right under the code.
First, we import the matplotlib module and set matplotlib to display the plots right in the Jupyter Notebook.
We will draw a bar plot where each bar will represent one of the top 10 movies. We can do this by calling the plot method and setting the argument to . This tells to draw a horizontal bar plot.
![]()
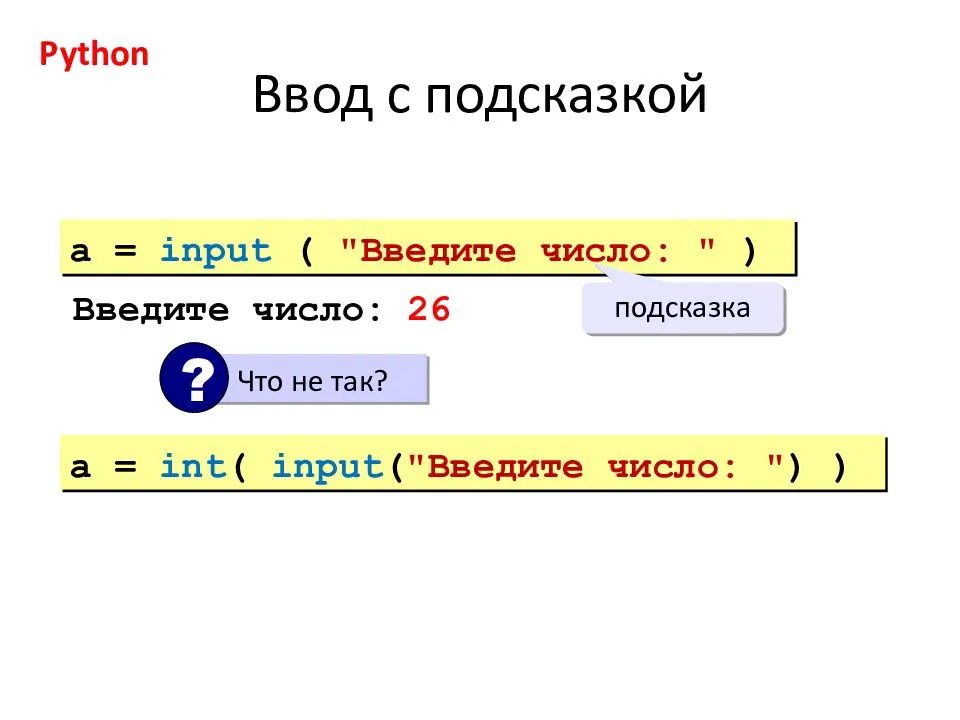
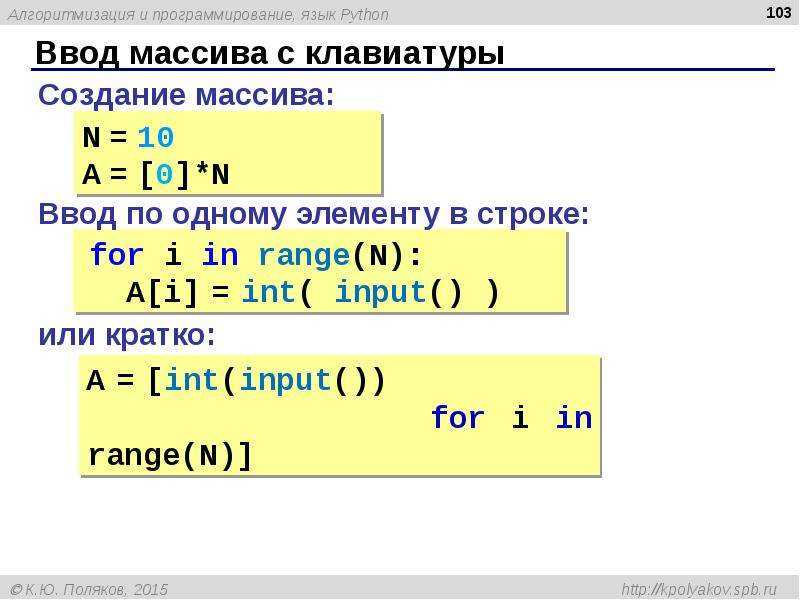
Let’s create a histogram of IMDB Scores to check the distribution of IMDB Scores across all movies. Histograms are a good way to visualize the distribution of a data set. We use the method on the IMDB Scores series from our movies DataFrame and pass it the argument.
![]()
This data visualization suggests that most of the IMDB Scores fall between six and eight.
Получение значений нескольких файлов
Давайте посмотрим на другой пример.
Скажем, нам нужно было получить итого только по Москве из каждого отчета о продажах и собрать их в список. Мы знаем, что сумма сохраняется в ячейке в каждой книге.
Для этого примера мы будем использовать другую библиотеку — . Вы можете установить её с помощью pip или conda, используя код ниже:
pip install openpyxl###conda install openpyxl
А теперь посмотрим код и что он выполняет:
# импортируем библиотеку и создаем переменныеimport openpyxlfiles = [] #укажите здесь путь к файламvalues = []# пишем циклfor file in files: wb = openpyxl.load_workbook(file) sheet = wb value = sheet.value values.append(value)
Давайте разберем это шаг за шагом, сначала мы:
- Создаем список (), который содержит ссылки на все наши файлы. В Windows мы можем нажать и использовать Копировать как путь (или, Copy as Path), чтобы получить путь к файлу.
- И создаем пустой список для хранения наших значений ()
- Пишем цикл, который будет выполнять нужные нам манипуляции с каждым файлом:
— с помощью метода загружаем файл
— используем и для ссылки на имя листа, так и на ссылки на ячейки таблицы (на нужном нам листе в рабочей книге)
Если у вас Excel на русском языке, то вместо указывайте .
— и используем атрибут , чтобы извлечь значение ячейки и добавить его в список методом


