
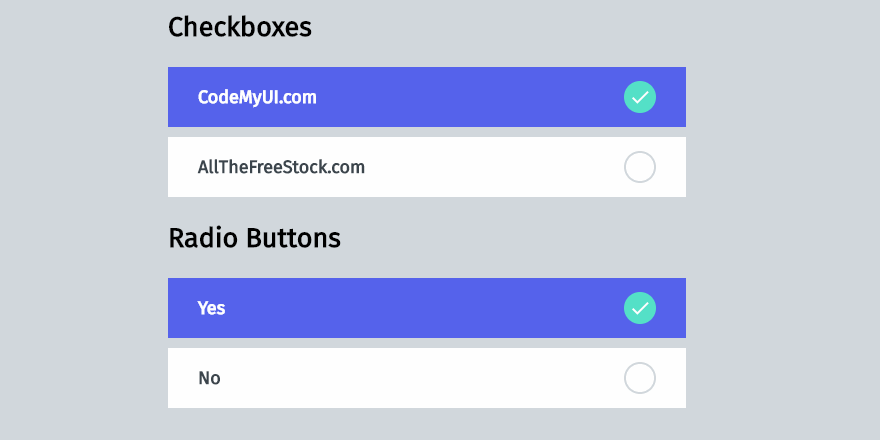
Стилизация checkbox. Введение
Эта статья будет коротенькая, но надеюсь, полезная, в ней я хочу показать, как быстро и просто реализуется стилизация checkbox с помощью jQuery. Все что нам потребуется, это обернуть checkbox span`он и div`ом, после чего скрыть сам чекбокс — этого мы добьемся с помощью css стилей. Остальное реализуем с помощью jQuery. При клики по диву, в котором будет находится наш чекбокс, мы будем проверять его атрибута checked и в зависимости от значения — true или false, будем менять изображение чекбокса, которое зададим span`у с помощью стилей. Для получения значения атрибута стоит использовать метод prop, в отличии от attr, он работает всегда, корректно отдает значение атрибутов для чекбокса.
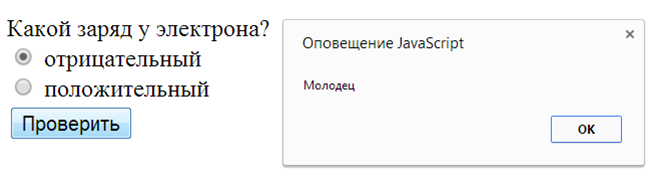
Вариант №1 проверки чокнутого checkbox
Нам потребуется тег input с уникальным идентификатором(id) и еще кнопка по которой мы будем нажимать!
<input type=»checkbox» id=»rules»><i>Я согласен с <a href=»ссылка»>Условиями</a></i>
<button id=»submit»>Создать аккаунт</button>
Далее нам понадобится скрипт, который сможет определить, msk kb накат чекбокс или нет:
if (rules.checked) { alert(«Чекбокс нажат -вариант №1»); } else { alert(«Чекбокс не нажат-вариант №1»); }
Теперь нам понадобится onclick, для отслеживания нажатия на кнопку! И соберем весь код вместе:
<input type=»checkbox» id=»rules»><i>Я согласен с <a href=»https://dwweb.ru/page/more/rules.html» target=»_blank»>Условиями</a></i>
<button id=»submit»>Создать аккаунт</button>
<script>
submit.onclick = function(){
if (rules.checked) { alert(«Чекбокс нажат -вариант №1»); } else { alert(«Чекбокс не нажат-вариант №1»); }
}
</script>
Valeur
Une chaîne de caractères () qui représente la valeur de la case à cocher. Cette chaîne de caractères n’est pas affichée côté client mais est envoyée au serveur comme valeur associée à la donnée envoyée avec le nom de la case à cocher. Par exemple :
Dans cet exemple, on a le nom (l’attribut ) utilisé pour la case à cocher avec une valeur (l’attribut ) qui est . Lorsque le formulaire est envoyé, les données seront transmises sous la forme .
Si l’attribut n’était pas renseigné, la valeur par défaut sera (dans l’exemple, les données envoyées au serveur auraient la forme ).
Note : Si la case à cocher n’est pas cochée lorsque le formulaire est envoyé, aucune valeur n’est envoyée au serveur pour indiquer cet état (autrement dit, le client n’envoie pas quelque chose comme ) ; la valeur n’est pas transmise au serveur du tout.
Value
A representing the value of the checkbox. This is not displayed on the client-side, but on the server this is the given to the data submitted with the checkbox’s . Take the following example:
In this example, we’ve got a name of , and a value of . When the form is submitted, the data name/value pair will be .
If the attribute was omitted, the default value for the checkbox is , so the submitted data in that case would be .
Note: If a checkbox is unchecked when its form is submitted, there is no value submitted to the server to represent its unchecked state (e.g. ); the value is not submitted to the server at all. If you wanted to submit a default value for the checkbox when it is unchecked, you could include an <input type=»hidden»> inside the form with the same and , generated by JavaScript perhaps.
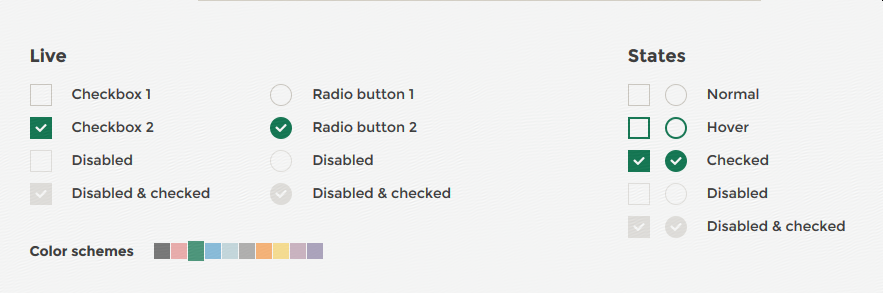
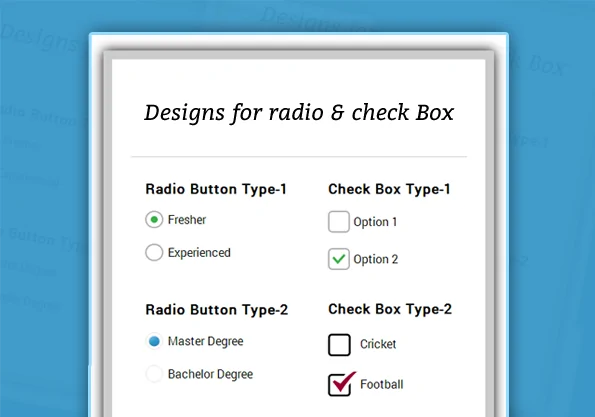
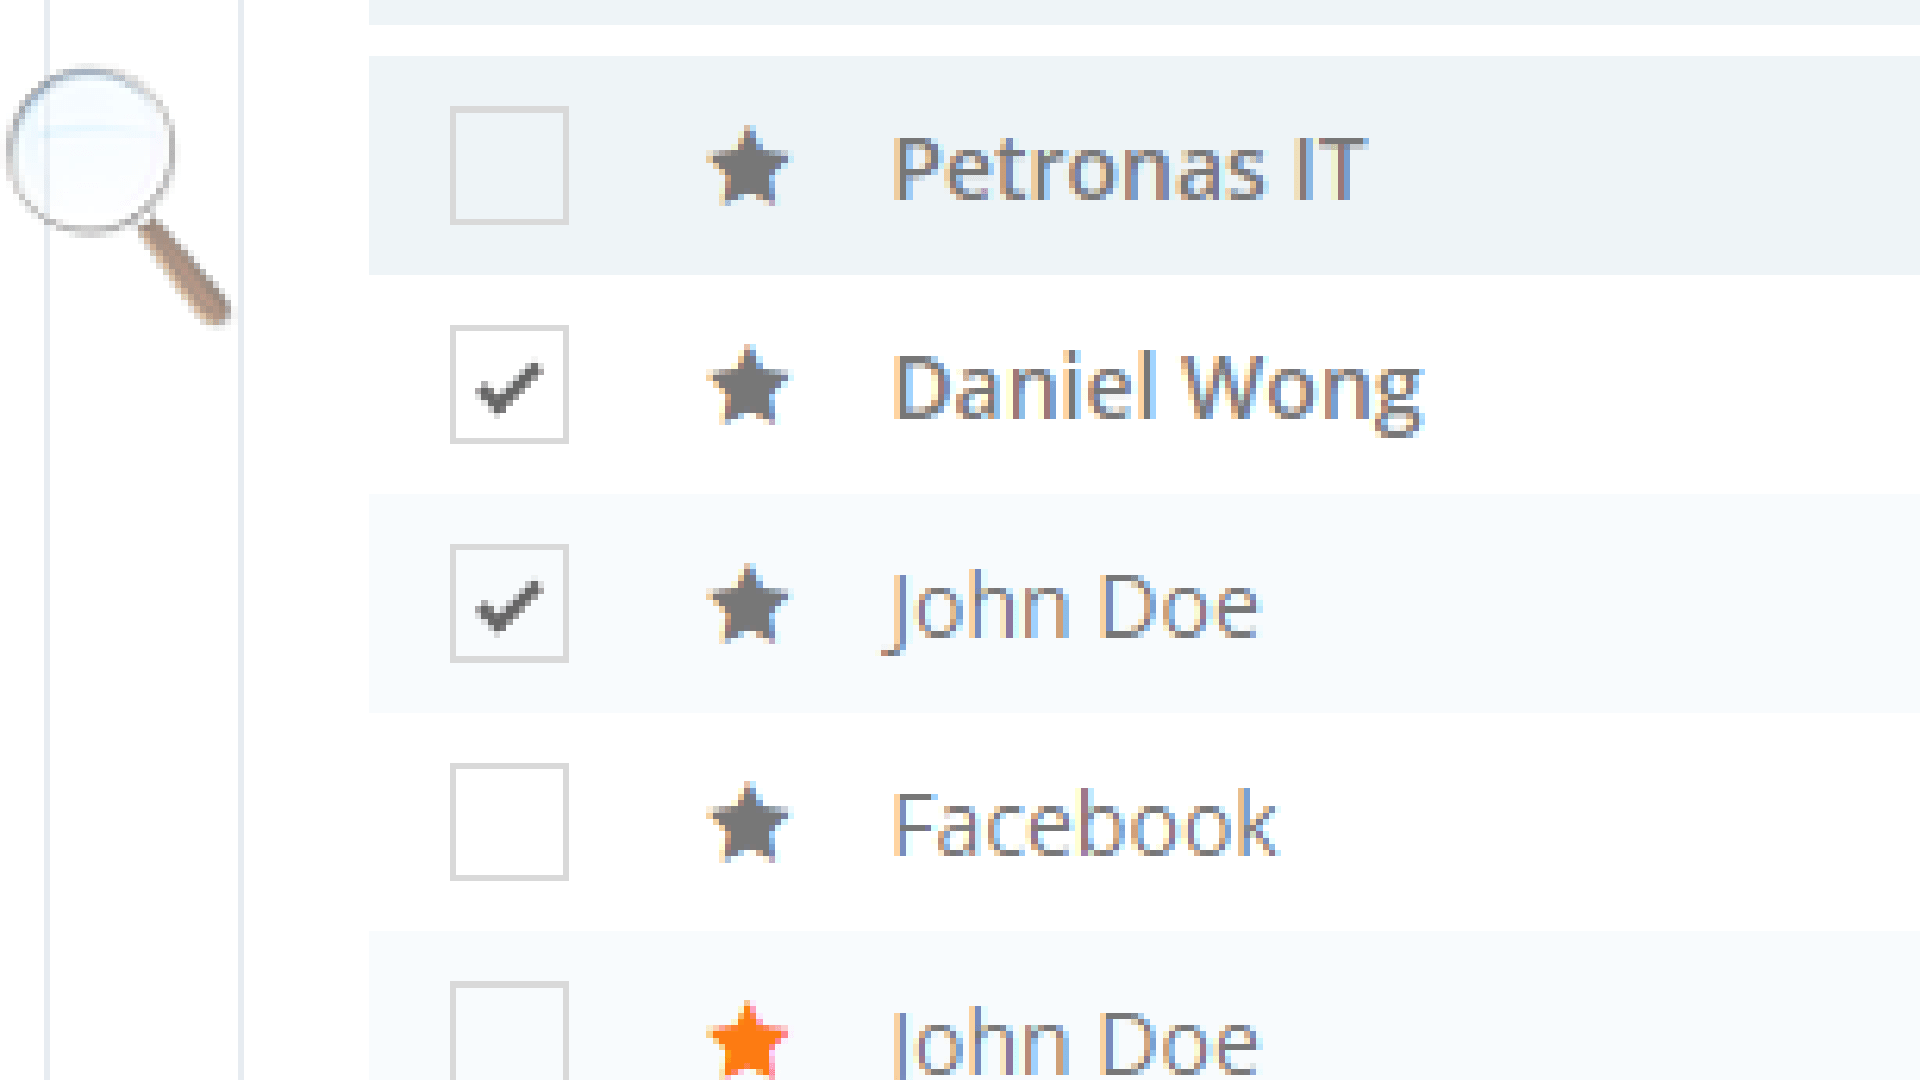
Картинка вместо чекбокса | htmlbook.ru
Исходные чекбоксы в форме выглядят хотя и привычно, но уже несколько старомодно. Порой хочется вместо чекбокса использовать стильную картинку, которая лучше будет вписываться в существующий дизайн. С помощью CSS3 мы можем это сделать без всяких скриптов, при этом учтём и старые версии браузеров, в которых функционал формы должен сохраниться.
Для начала подготовим изображения. Нам потребуется две картинки соответствующие разному статусу чекбокса — когда он включен и выключен (рис. 1).
Рис. 1. Вверху чекбокс выключен, внизу он включен
Желательно объединить две картинки в одну в графическом редакторе, сделать из них так называемый CSS-спрайт. Дело в том, что первая картинка покажется сразу после загрузки, а вторая начнёт загружаться только после щелчка по чекбоксу. Несмотря на малый размер изображений и объём загружаемого файла, на загрузку и отображение картинки в первый раз потребуется какое-то время. Даже когда речь идёт о доли секунды эта задержка заметна визуально. Если же мы объединим рисунки в одно изображение, то оно будет загружаться целиком и показываться без малейшего замедления. Чтобы создать иллюзию того, что у нас одна картинка, а не две, надо ограничить размеры элемента и выводить изображение в виде фона. И в нужный момент просто-напросто смещать фон вверх или вниз.
HTML
После того, как спрайт сделан, перейдём к HTML-коду. Он содержит три важных элемента.
Первый это тег <label>, он создаёт вокруг чекбокса невидимую рамку, щелчок внутри которой включает или выключает галочку в чекбоксе. Его наличие позволяет не щёлкать непосредственно по чекбоксу, размеры которого довольно малы, а щёлкать за пределами чекбокса. При этом всё будет работать именно так, как нам и нужно, даже несмотря на то, что по самой галочке мы не попали.
Далее идёт сам чекбокс (<input type=»checkbox»>) со всеми желаемыми параметрами. Здесь никаких ограничений нет, вставляйте в тег любые необходимые атрибуты.
После <input> следует пустой <span>, этот элемент будет выполнять декоративную роль, именно к нему и применяется наш рисунок.
CSS
Для начала определим размер отображаемого рисунка. У меня он составляет 32х26 пикселов. Заметьте, здесь речь идёт не о спрайте, где у нас объединено две картинки, а об одном изображении. Эти размеры подставляем в стиль селектора label.


Стиль чекбокса не трогаем, он в любом случае не будет виден и переходим к нашему «декоративному»
Важно сделать чтобы элемент занимал всю доступную область внутри . Для этого задаём абсолютное позиционирование и устанавливаем ширину и высоту как 100% от родителя
Заодно смещаем элемент в левый верхний угол.
Картинка добавляется как фон, здесь никаких сюрпризов нет, и меняем для разнообразия форму курсора.
На этом этапе наш чекбокс уже превратился в симпатичную картинку, осталось только задать смену рисунка, когда внутри чекбокса стоит галочка. Для этого воспользуемся псевдоклассом :checked, он срабатывает при установке галочки в поле. Правда тут есть одна хитрость. :checked применяется к чекбоксу, а менять его стиль необходимости нет, нас интересует только «декоративный» span. Поэтому используем соседние селекторы и добавляем стиль к span идущему после чекбокса с галочкой.
Надеюсь, теперь стало понятно такое положение <span> в HTML-коде, как раз для того, чтобы его легко стилизовать с помощью псевдокласса :checked.
Собираем код воедино (пример 1) и тестируем его в браузерах.
Пример 1.
Картинка вместо чекбокса
HTML5CSS3IECrOpSaFx
Браузеры
Все современные версии браузеров — Firefox, Chrome, IE9, Opera, Safari показали одинаковый рабочий результат.
Также код не будет работать в IE8, эта версия не понимает :checked. Давайте сделаем поддержку старых версий IE, для чего вернём настройки элементов формы по умолчанию. Для начала к элементам желательно добавить классы и в стилях обращаться именно к ним. Так мы сможем задать стиль любого элемента без обращения к псевдоклассам CSS3.
Чтобы в стилях затронуть версии IE младше 9.0 воспользуемся условными комментариями. В стилях остаётся задать ширину и высоту для label по умолчанию и скрыть span (пример 2).
Пример 2. Стиль для IE8
Данный код надо вставить сразу после закрывающего тега </style> в примере 1. Таким образом мы получим классический вид чекбоксов в IE7-8 и меняющуюся картинку в современных браузерах.
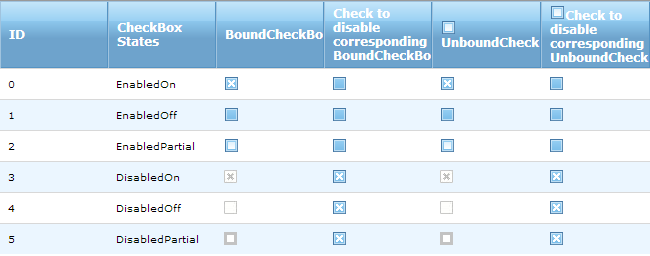
Свойства элемента «Флажок»
| Свойство | Описание |
|---|---|
| AutoSize | Автоподбор размера «Флажка». True – размер автоматически подстраивается под длину набираемой строки. False – размер элемента управления определяется свойствами Width и Height. |
| ControlSource | Ссылка на источник данных для свойства Value. |
| ControlTipText | Текст всплывающей подсказки при наведении курсора на CheckBox. |
| Enabled | Возможность взаимодействия пользователя с элементом управления. True – взаимодействие включено, False – отключено (цвет флажка и надписи становится серым). |
| Font | Шрифт, начертание и размер текста надписи. |
| Height | Высота элемента управления. |
| Left | Расстояние от левого края внутренней границы пользовательской формы до левого края элемента управления. |
| Picture | Добавление изображения вместо текста надписи или дополнительно к нему. |
| PicturePosition | Выравнивание изображения и текста в поле надписи. |
| TabIndex | Определяет позицию элемента управления в очереди на получение фокуса при табуляции, вызываемой нажатием клавиш «Tab», «Enter». Отсчет начинается с 0. |
| TextAlign* | Выравнивание текста надписи: 1 (fmTextAlignLeft) – по левому краю, 2 (fmTextAlignCenter) – по центру, 3 (fmTextAlignRight) – по правому краю. |
| Top | Расстояние от верхнего края внутренней границы пользовательской формы до верхнего края элемента управления. |
| TripleState | Определяет, может ли пользователь делать выбор между двумя состояниями «Флажка» или между тремя, включая серую галочку на сером квадрате. True – доступны три состояния, False – доступны два состояния. |
| Value | Значение «Флажка»: True – галочка установлена, False – галочка не установлена, Null – серая галочка на сером квадрате. |
| Visible | Видимость элемента CheckBox. True – элемент отображается на пользовательской форме, False – скрыт. |
| Width | Ширина элемента управления. |
| WordWrap | Перенос текста надписи на новую строку при достижении границы ее поля. True – перенос включен, False – перенос выключен. |
* При загруженной в поле надписи картинке свойство TextAlign не работает, следует использовать свойство PicturePosition.
Свойство по умолчанию для элемента CheckBox – Value, основное событие – Click.
В таблице перечислены только основные, часто используемые свойства «Флажка». Все доступные свойства отображены в окне Properties элемента управления CheckBox.
Обработка событий checkbox с использованием JavaScript
Теперь нужно привязать к чекбоксу событие, чтобы проверять его состояния, и выводить сообщение, если флажок не установлен
Обратите внимание, что я добавил к чекбоксу свойство checked, которое будет задано по умолчанию
Существует два события, которые можно привязать к чекбоксу. Они будут запускаться после изменения состояния элемента. Это события onclick и onchange.
Событие onchange не вызывается до тех пор, пока состояние checked не будет обновлено. Internet Explorer не запускает событие onсhange, пока с чекбокса не снят фокус ввода. Чтобы избежать этой проблемы, я рекомендую использовать событие onclick.
<input type="checkbox"onclick="checkFluency()" id="fluency"checked />
В коде HTML я добавляю событие onclick, которое буде вызывать функцию checkFluency():
functioncheckFluency()
{
  varcheckbox=document.getElementById('fluency');
  if(checkbox.checked!=true)
  {
    alert("you need to be fluent in English to apply for the job");
  }
}
В checkFluency() мы отслеживаем состояние чекбокса. Если флажок не установлен, то отображаем предупреждение.
Images
SlideshowSlideshow GalleryModal ImagesLightboxResponsive Image GridImage GridTab GalleryImage Overlay FadeImage Overlay SlideImage Overlay ZoomImage Overlay TitleImage Overlay IconImage EffectsBlack and White ImageImage TextImage Text BlocksTransparent Image TextFull Page ImageForm on ImageHero ImageBlur Background ImageChange Bg on ScrollSide-by-Side ImagesRounded ImagesAvatar ImagesResponsive ImagesCenter ImagesThumbnailsBorder Around ImageMeet the TeamSticky ImageFlip an ImageShake an ImagePortfolio GalleryPortfolio with FilteringImage ZoomImage Magnifier GlassImage Comparison Slider
Checked or not checked?
Notice how all the checkboxes so far have not been checked from the beginning — the user would have to interact with the checkbox to change its state from unchecked to checked. This might be what you want, but sometimes, you want the checkbox to be checked by default, either to suggest a choice to the user or because you are showing a checkbox with a value that corresponds to an existing setting, e.g. from a database. Fortunately, this is very simple — just add the checked attribute to the checkbox:
In the old days of XHTML, where each attribute should always have a value, even the boolean attributes, it would look like this:
Either way should work in all modern browsers, but the first way is shorter and more «HTML5-like».
Checkbox event handling using pure Javascript
Now what we need to do is to attach an event to the checkbox so it checks its state each time it’s changed and show the message if it has been unchecked , notice I added a checked property to the checkbox so it is checked by default.
There are two events that you can attach to the checkbox to be fired once the checkbox value has been changed they are the onclick and the onchange events.
There is a problem with the onchange event is that it is not called until the checked state has been updated and since Internet Explorer does not fire the onChange event till the checkbox loses focus so it will create different results than in Google chrome and other browsers so to avoid all this I recommend you stick to the onclick event.
Here I added an on click event and make it so it will call a function called checkFluency() once it is clicked
Here in the checkFluency() function , picked the checkbox and then if it is not checked an alert is shown saying “you need to be fluent in English to apply for the job”
Non custom check inputs (plain)
You can have or render a browser native checkbox input by setting the prop.
<template>
  <div>
    <b-form-group label="Plain inline checkboxes" v-slot="{ ariaDescribedby }">
      <b-form-checkbox-group
        v-model="selected"
        :options="options"
        :aria-describedby="ariaDescribedby"
        plain
      ></b-form-checkbox-group>
    </b-form-group>

    <b-form-group label="Plain stacked checkboxes" v-slot="{ ariaDescribedby }">
      <b-form-checkbox-group
        v-model="selected"
        :options="options"
        :aria-describedby="ariaDescribedby"
        plain
        stacked
      ></b-form-checkbox-group>
    </b-form-group>
  </div>
</template>

<script>
  export default {
    data() {
      return {
        selected: [],
        options:
      }
    }
  }
</script>
Note: The prop has no effect when or is set.
Checkbox values and v-model
By default, value will be when checked and when unchecked. You can customize the checked and unchecked values by specifying the and properties, respectively.

The binds to the prop. When you have multiple checkboxes that bind to a single data state variable, you must provide an array reference () to your . Do not use the prop directly.
Note that when is bound to multiple checkboxes (i.e an array ref), the is not used. Only the value(s) of the checked checkboxes will be returned in the bound array. You should provide a unique value for each checkbox’s prop (the default of will not work when bound to an array)
To pre-check any radios, set the to the value(s) of the checks that you would like pre-selected.
When placing individual components within a , most props and the are inherited from the .
Note: the prop does not affect the native ‘s attribute, because browsers don’t include unchecked boxes in form submissions. To guarantee that one of two values is submitted in a native submit (e.g. or ), use radio inputs instead. This is the same limitation that .
Multiple checkboxes and accessibility
When binding multiple checkboxes together, you must set the prop to the same value for all s in the group individually or via the prop of . This will inform users of assistive technologies that the checkboxes are related and enables native browser keyboard navigation.
Whenever using multiple checkboxes, it is recommended that the checkboxes be placed in a component to associate a label with the entire group of checkboxes. See examples above.
Считаем количество отмеченных галочек
Если вы смотрели CSS-код из предыдущего этапа, то обратили внимание на счётчики, которые мы задаём прямо в CSS. Современный CSS получил поддержку таких мини-переменных, которые могут считать количество отображённых элементов. . Чтобы увеличить значение счётчика на единицу, используют команду counter-increment
Используем её, чтобы посчитать сначала количество всех чекбоксов:
Чтобы увеличить значение счётчика на единицу, используют команду counter-increment. Используем её, чтобы посчитать сначала количество всех чекбоксов:
А потом считаем количество отмеченных галочек:
Последнее, что нам осталось сделать, — вывести на экран итоговое количество выбранных добавок.
Checkbox group options array
can be an array of strings or objects. Available fields:
- The selected value which will be set on
- Disables item for selection
- Display text, or Display basic inline html
can be a string, number, or simple object. Avoid using complex types in values.
If both and are provided, will take precedence. Only basic/native HTML is supported in the field (components will not work). Note that not all browsers will render inline html (i.e. , , etc.) inside elements of a .
Be cautious of placing user supplied content in the field, as it may make you vulnerable to XSS attacks, if you do not first sanitize the user supplied string.
const options =
If an array entry is a string, it will be used for both the generated and fields.
You can mix using strings and in the array.
Internally, BootstrapVue will convert the above array to the following array (the ) format:
const options =
Options as an array of objects
const options = [
  { text: 'Item 1', value: 'first' },
  { text: 'Item 2', value: 'second' },
  { html: '<b>Item</b> 3', value: 'third', disabled: true },
  { text: 'Item 4' },
  { text: 'Item 5', value: { foo: 'bar', baz: true } }
]
If is missing, then will be used as both the and fields. If you use the property, you must supply a property.
Internally, BootstrapVue will convert the above array to the following array (the ) format:
const options = [
  { text: 'Item 1', value: 'first', disabled: false },
  { text: 'Item 2', value: 'second', disabled: false },
  { html: '<b>Item</b> 3', value: 'third', disabled: true },
  { text: 'Item 4', value: 'Item 4', disabled: false },
  { text: 'Item 5', value: 'E', disabled: false }
]
Changing the option field names
If you want to customize the field property names (for example using field for display ) you can easily change them by setting the , , , and props to a string that contains the property name you would like to use:
<template>
  <div>
    <b-form-checkbox-group
      v-model="selected"
      :options="options"
      class="mb-3"
      value-field="item"
      text-field="name"
      disabled-field="notEnabled"
    ></b-form-checkbox-group>
    <div class="mt-3">Selected: <strong>` selected `</strong></div>
  </div>
</template>

<script>
  export default {
    data() {
      return {
        selected: [],
        options:
      }
    }
  }
</script>
Window
Window Object
alert()
atob()
blur()
btoa()
clearInterval()
clearTimeout()
close()
closed
confirm()
console
defaultStatus
document
focus()
frameElement
frames
history
getComputedStyle()
innerHeight
innerWidth
length
localStorage
location
matchMedia()
moveBy()
moveTo()
name
navigator
open()
opener
outerHeight
outerWidth
pageXOffset
pageYOffset
parent
print()
prompt()
resizeBy()
resizeTo()
screen
screenLeft
screenTop
screenX
screenY
scrollBy()
scrollTo()
scrollX
scrollY
sessionStorage
self
setInterval()
setTimeout()
status
stop()
top
Window Console
assert()
clear()
count()
error()
group()
groupCollapsed()
groupEnd()
info()
log()
table()
time()
timeEnd()
trace()
warn()
Window History
back()
forward()
go()
length
Window Location
assign()
hash
host
hostname
href
origin
pathname
port
protocol
reload()
replace()
search
Window Navigator
appCodeName
appName
appVersion
cookieEnabled
geolocation
javaEnabled()
language
onLine
platform
product
taintEnabled()
userAgent
Window Screen
availHeight
availWidth
colorDepth
height
pixelDepth
width
All attributes of input
| Attribute name | Values | Notes |
|---|---|---|
| step | Specifies the interval between valid values in a number-based input. | |
| required | Specifies that the input field is required; disallows form submission and alerts the user if the required field is empty. | |
| readonly | Disallows the user from editing the value of the input. | |
| placeholder | Specifies placeholder text in a text-based input. | |
| pattern | Specifies a regular expression against which to validate the value of the input. | |
| multiple | Allows the user to enter multiple values into a file upload or email input. | |
| min | Specifies a minimum value for number and date input fields. | |
| max | Specifies a maximum value for number and date input fields. | |
| list | Specifies the id of a <datalist> element which provides a list of autocomplete suggestions for the input field. | |
| height | Specifies the height of an image input. | |
| formtarget | Specifies the browsing context in which to open the response from the server after form submission. For use only on input types of «submit» or «image». | |
| formmethod | Specifies the HTTP method (GET or POST) to be used when the form data is submitted to the server. Only for use on input types of «submit» or «image». | |
| formenctype | Specifies how form data should be submitted to the server. Only for use on input types «submit» and «image». | |
| formaction | Specifies the URL for form submission. Can only be used for type=»submit» and type=»image». | |
| form | Specifies a form to which the input field belongs. | |
| autofocus | Specifies that the input field should be in focus immediately upon page load. | |
| accesskey | Defines a keyboard shortcut for the element. | |
| autocomplete | Specifies whether the browser should attempt to automatically complete the input based on user inputs to similar fields. | |
| border | Was used to specify a border on an input. Deprecated. Use CSS instead. | |
| checked | Specifies whether a checkbox or radio button form input should be checked by default. | |
| disabled | Disables the input field. | |
| maxlength | Specifies the maximum number of characters that can be entered in a text-type input. | |
| language | Was used to indicate the scripting language used for events triggered by the input. | |
| name | Specifies the name of an input element. The name and value of each input element are included in the HTTP request when the form is submitted. | |
| size | Specifies the width of the input in characters. | |
| src | Defines the source URL for an image input. | |
| type | buttoncheckboxfilehiddenimagepasswordradioresetsubmittext | Defines the input type. |
| value | Defines an initial value or default selection for an input field. |
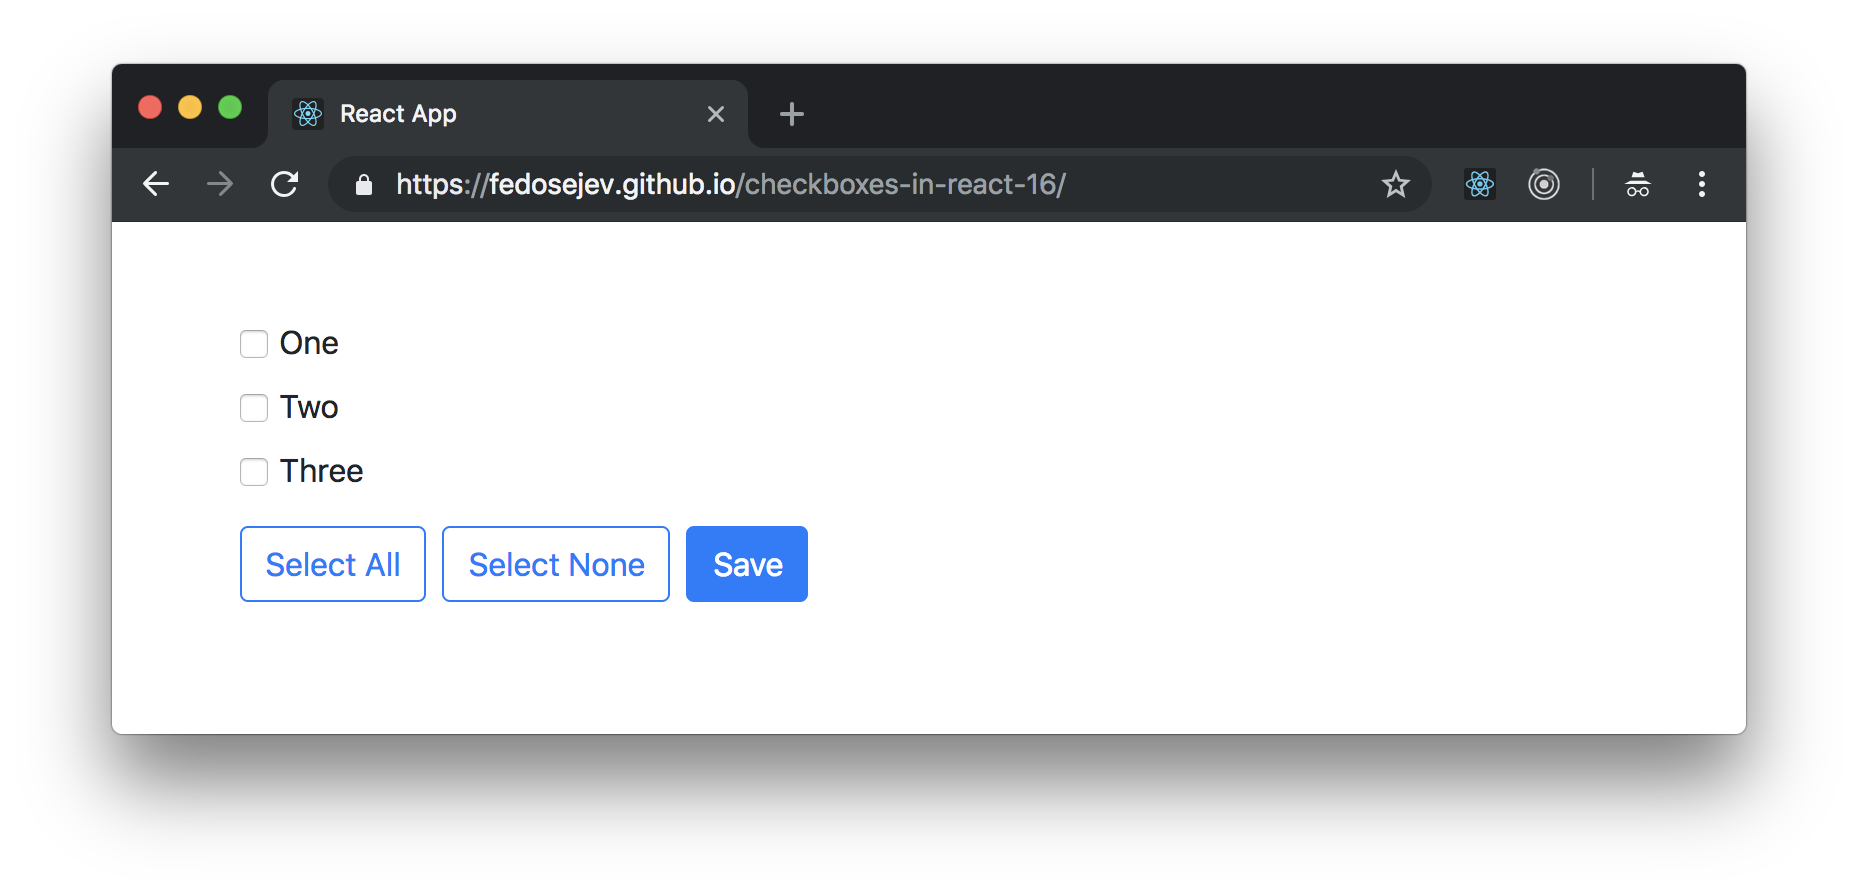
Check / Uncheck all checkboxes
The following page has three checkboxes and a button. When you click the button, if the checkboxes are checked, they will be unchecked and vise versa:
How it works:
First, define the function that checks or unchecks all checkboxes with the name :
When you click the button, it checked all the checkboxes. And. If you click the button again, it should uncheck all the checkboxes. To do this switch, you need to reassign the click event handler whenever the click event fires.
Second, select the button and assign the function to the property of the button:
Third, define the function that checks all the checkboxes:
Finally, define the function that unchecks all the checkboxes:
Demo:
Contextual states
Bootstrap includes validation styles for and states on most form controls.
Generally speaking, you’ll want to use a particular state for specific types of feedback:
- (denotes invalid state) is great for when there’s a blocking or required field. A user must fill in this field properly to submit the form.
- (denotes valid state) is ideal for situations when you have per-field validation throughout a form and want to encourage a user through the rest of the fields.
- Displays no validation state (neither valid nor invalid)
To apply one of the contextual state icons on , set the prop to (for invalid), (for valid), or (no validation state).
Note: Contextual states are not supported when in button mode.
Contextual state and validation example
<template>
  <div>
    <b-form-checkbox-group
      v-model="value"
      :options="options"
      :state="state"
      name="checkbox-validation"
    >
      <b-form-invalid-feedback :state="state">Please select two</b-form-invalid-feedback>
      <b-form-valid-feedback :state="state">Thank you</b-form-valid-feedback>
    </b-form-checkbox-group>
  </div>
</template>

<script>
  export default {
    data() {
      return {
        value: [],
        options:
      }
    },
    computed: {
      state() {
        return this.value.length === 2
      }
    }
  }
</script>
Required constraint
When using individual components (not in a ), and you want the checkbox(es) to be in your form, you must provide a on each in order for the required constraint to work. All components tied to the same must have the same .
The is required in order for Assistive Technologies (such as screen readers, and keyboard only users) to know which checkboxes belong to the same form variable (the name also automatically enables native browser keyboard navigation), hence will only work if is set. will automatically generate a unique input name if one is not provided on the group.


