
Custom Field Suite
![]()
- Text — текстовая строка;
- Textarea — поле для текста из нескольких строк;
- WYSIWYG — графический редактор;
- True / False — чекбокс (блок с галочкой);
- Color — выбор цвета;
- Date — выбор даты;
- Select — несколько чекбоксов или выпадающий список;
- File Upload — загрузка файла;
- User — выбор пользователя;
- Relationship — виджет для похожих постов;
- Loop — контейнер повторяющихся полей;
- Hyperlink — URL ссылки;
- Tab — объединение группы полей в табы.
Плюс модуля Custom Field Suite в том, что кроме ввода определенных данных (текстов, дат, цветов) здесь есть элементы организации полей: табы и контейнеры. Последний, например, позволяет реализовать галерею на слайдере Owl Carousel 2 за счет создания нескольких повторяющихся объектов «текст + картинка». Табы мне также пригодились в работе. Решение абсолютно бесплатное, функциональное и очень простое.
Вывод произвольных полей в WordPress с помощью CFS
Давайте разберем на реальном примере как вывести произвольные WordPress поля с помощью модуля Custom Field Suite. Алгоритм приблизительно следующий:
1. В самом начале, разумеется, устанавливаем и активируем Custom Field Suite.
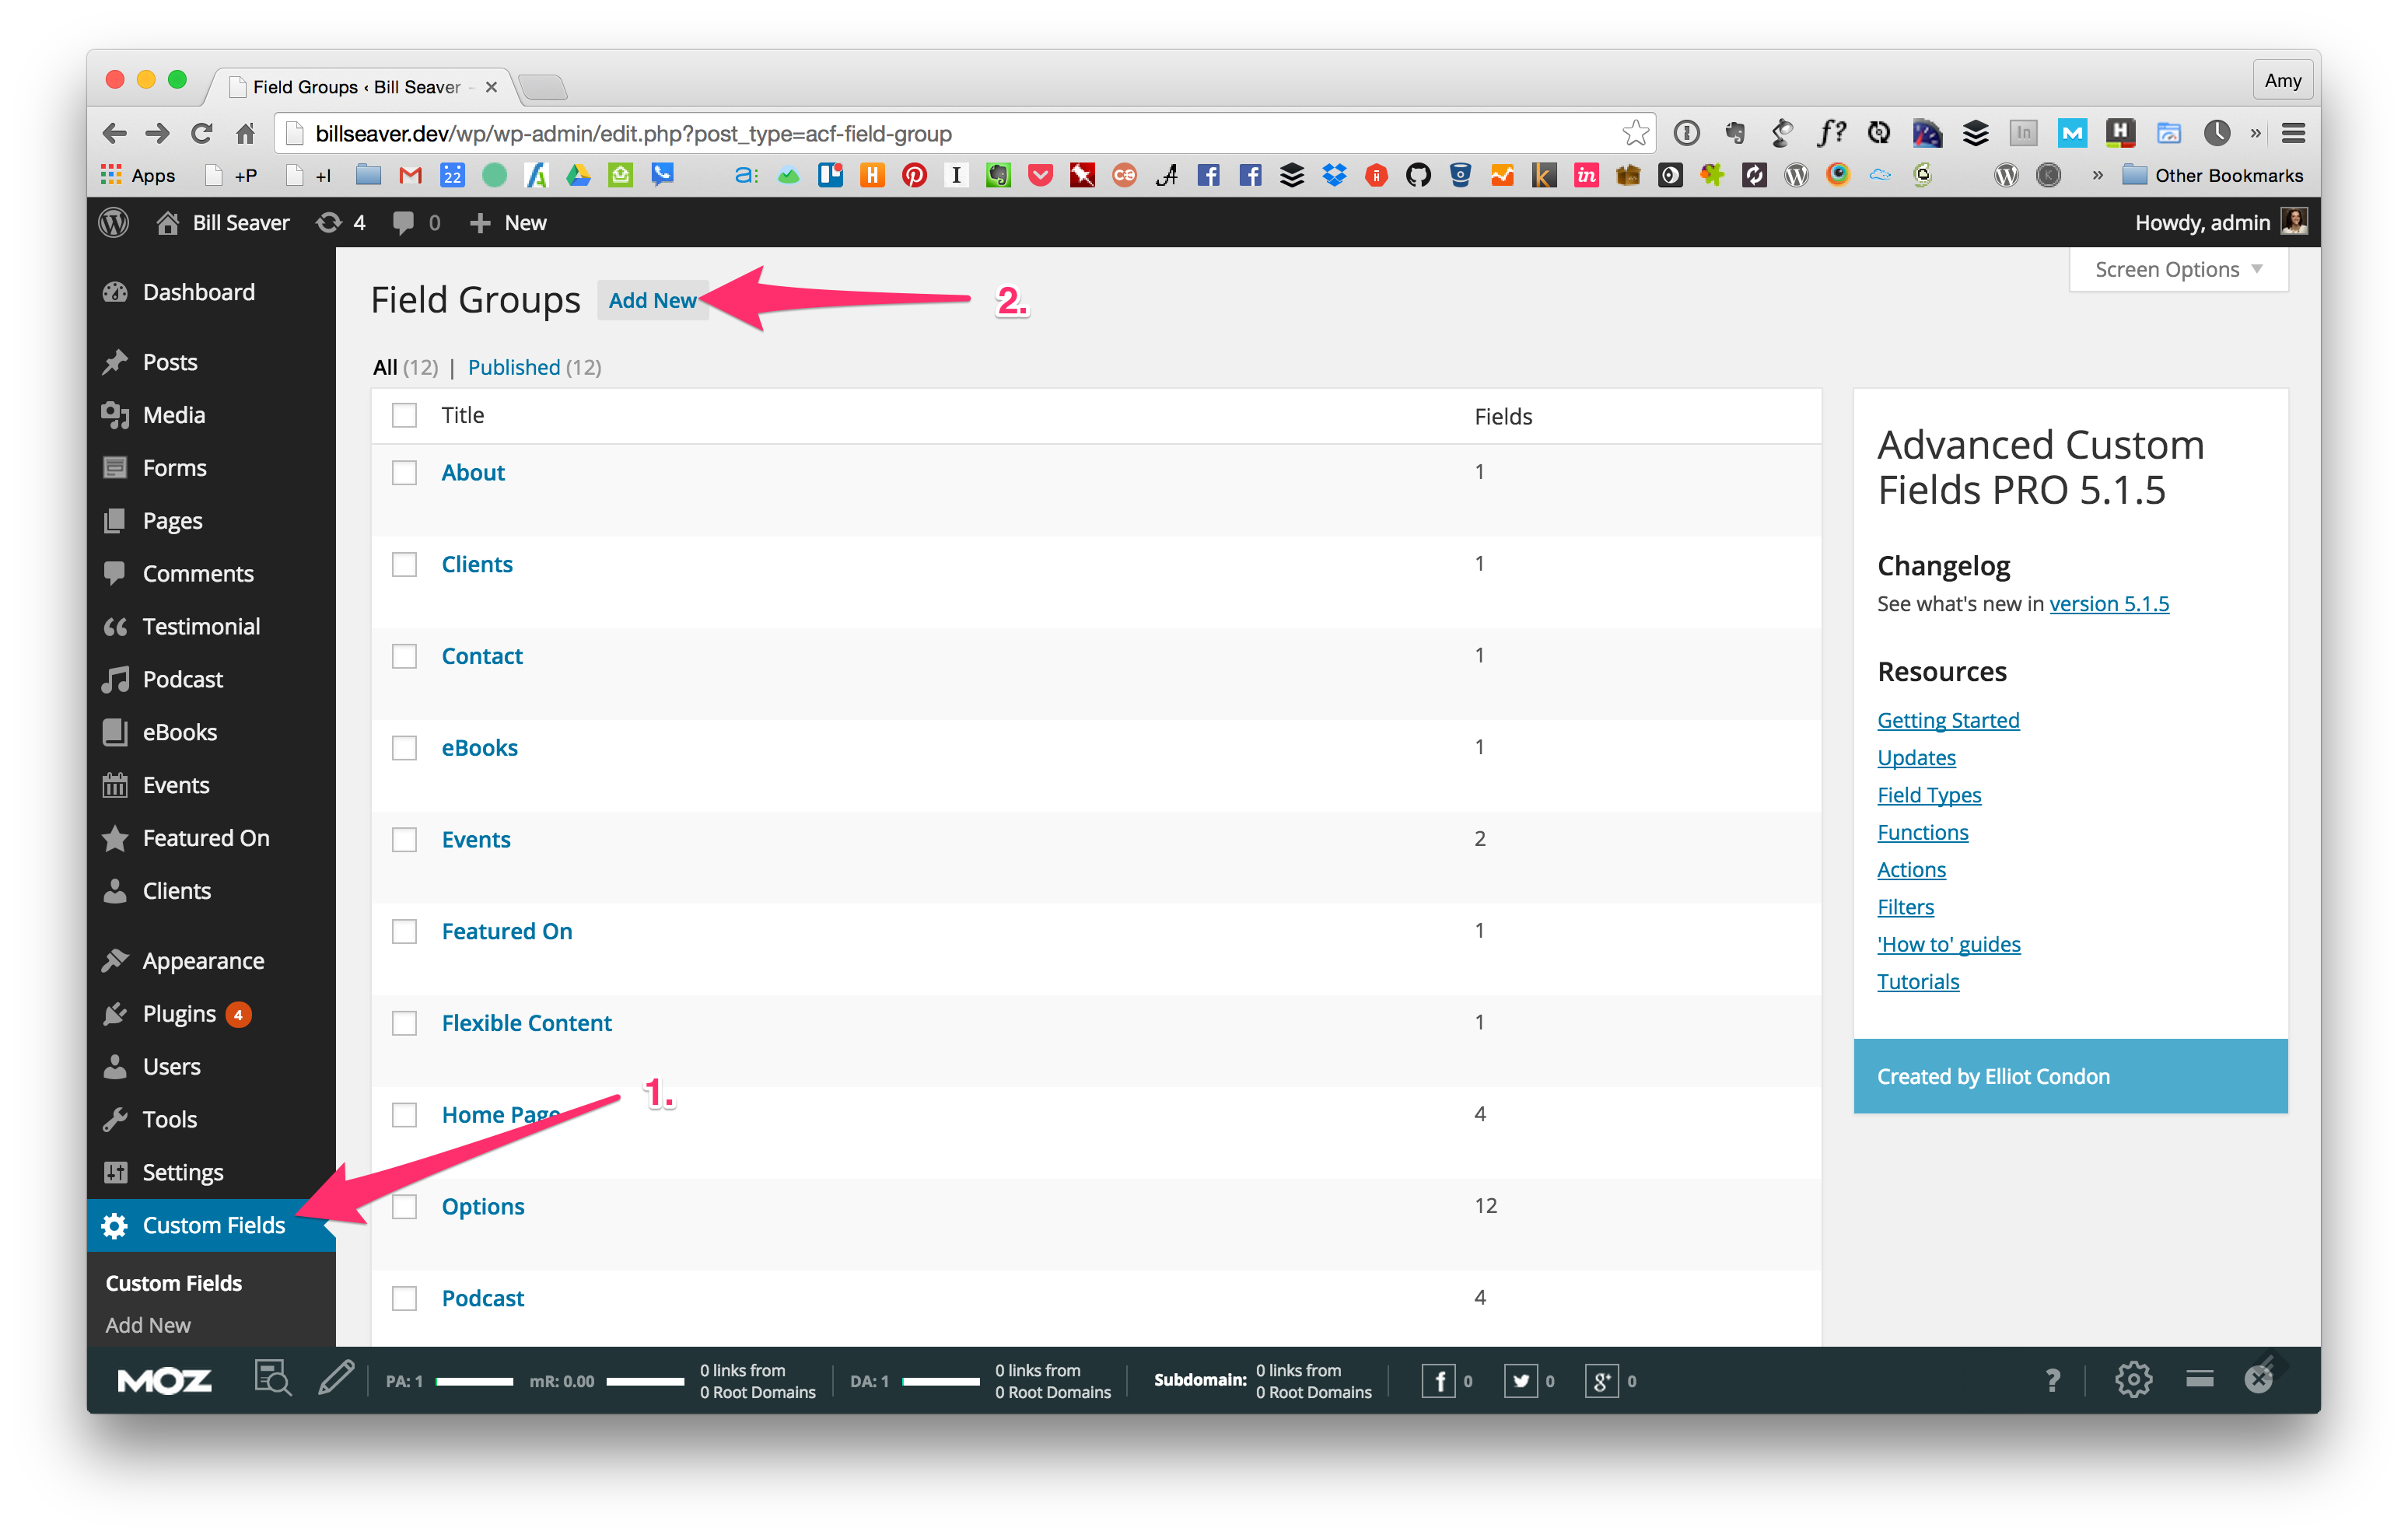
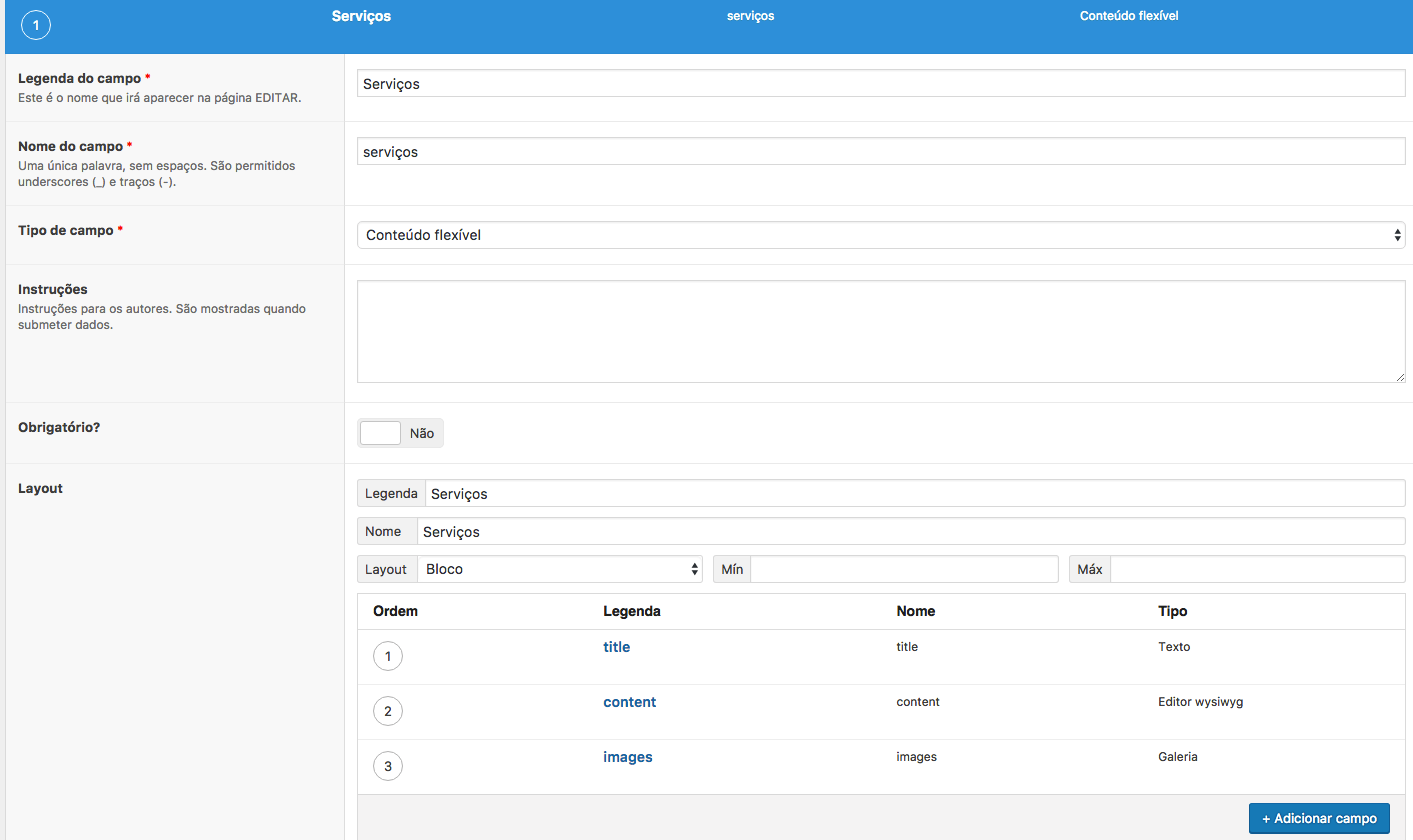
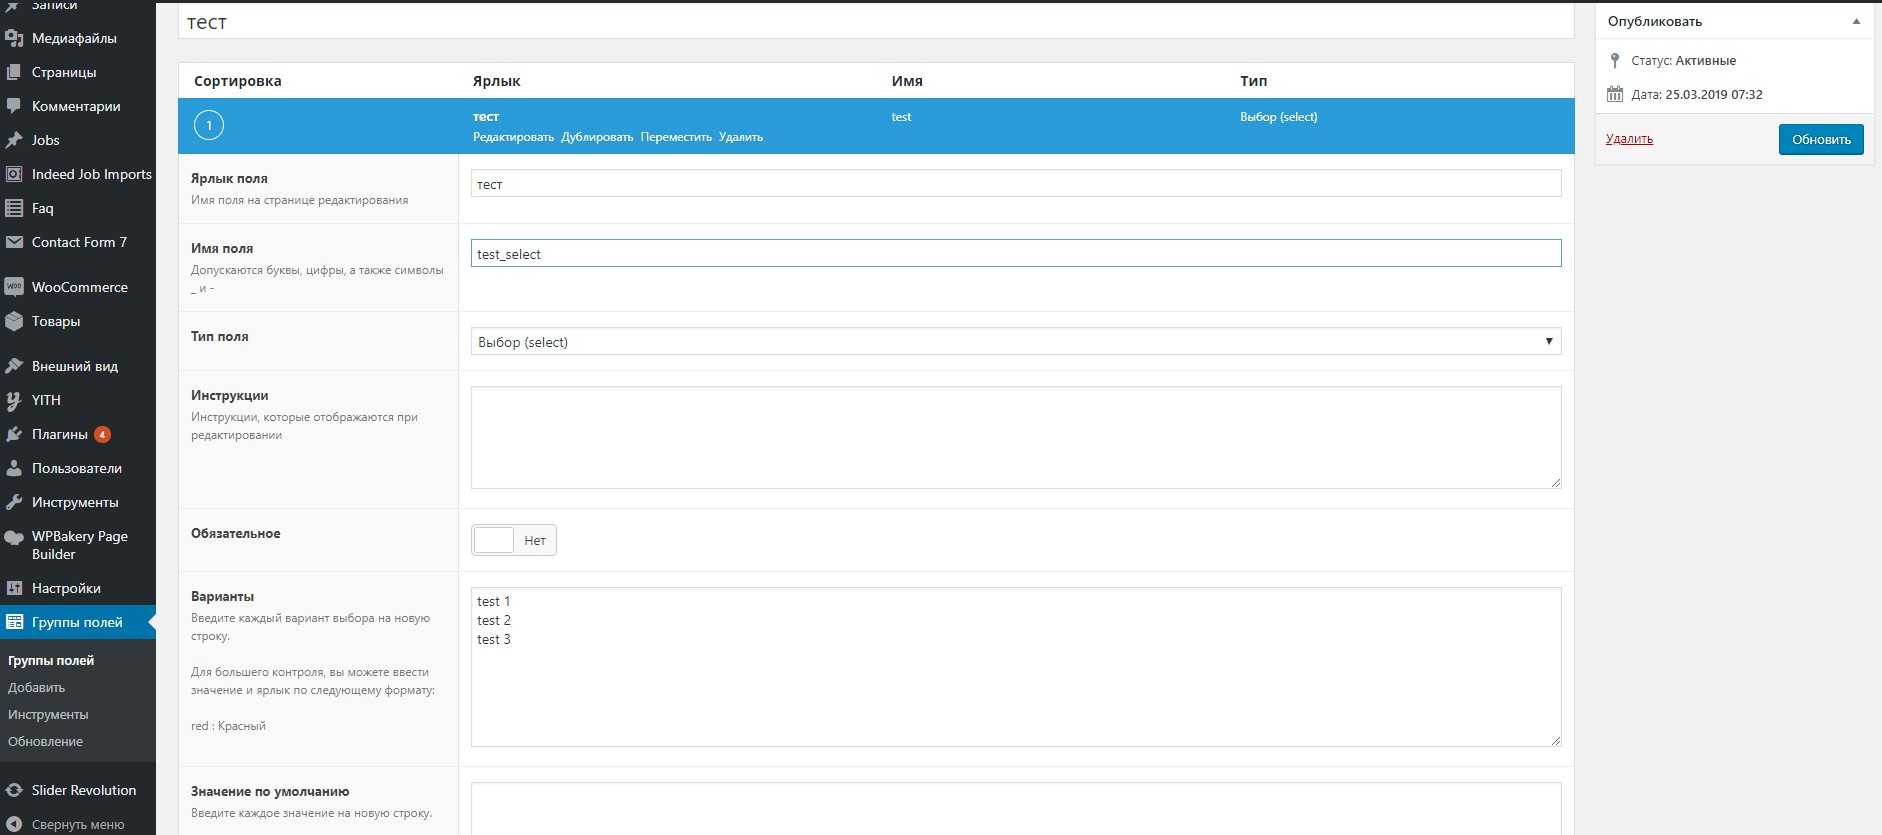
2. Далее заходим в админку вордпресс в раздел «Field Groups» (Группа полей). Там содержится список всех созданных вами элементов и кнопка «Add New» (Добавить новую) . С ее помощью можно создать новый набор нужных элементов. Кликаем и видим на открывшейся странице 3 блока для ввода информации:
- Fields — список всех элементов/полей;
- Placement Rules — правила размещения;
- Extras — дополнительные настройки.
Первым делом нужно добавить произвольные поля в WordPress с помощью соответствующей кнопки.
![]()
Для полей требуется определить некоторые настройки, например:
- тип;
- название (отображается в админке);
- имя (используется в коде шаблона, поэтому должно быть на английском);
- значение по умолчанию;
- обязательное поле или нет;
- примечание для редактора.
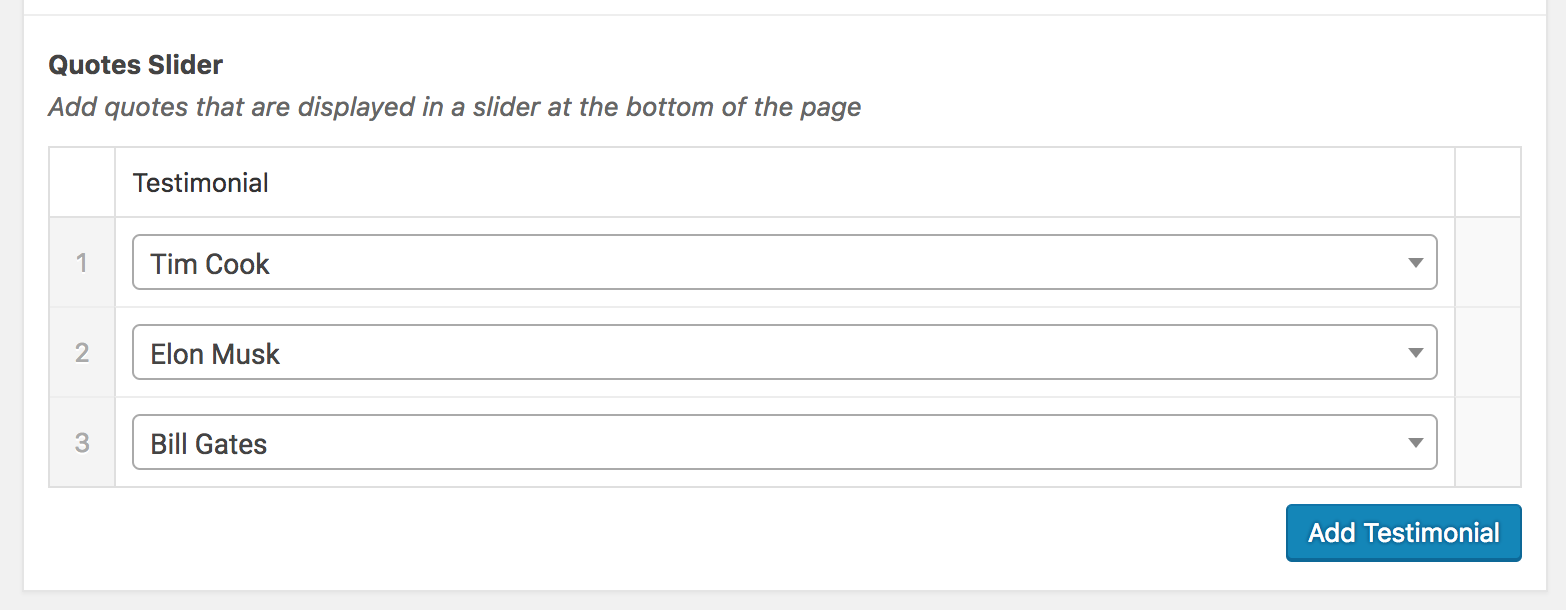
Большую часть этих характеристик вы встретите и в других типах произвольных полей, однако в каждом из них есть и свои особенности. На картинке выше можете видеть 6 элементов, 3 из которых являются табами (tabs), а 3 текстовой областью. В результате в админке пользователь увидит следующую картинку:
![]()
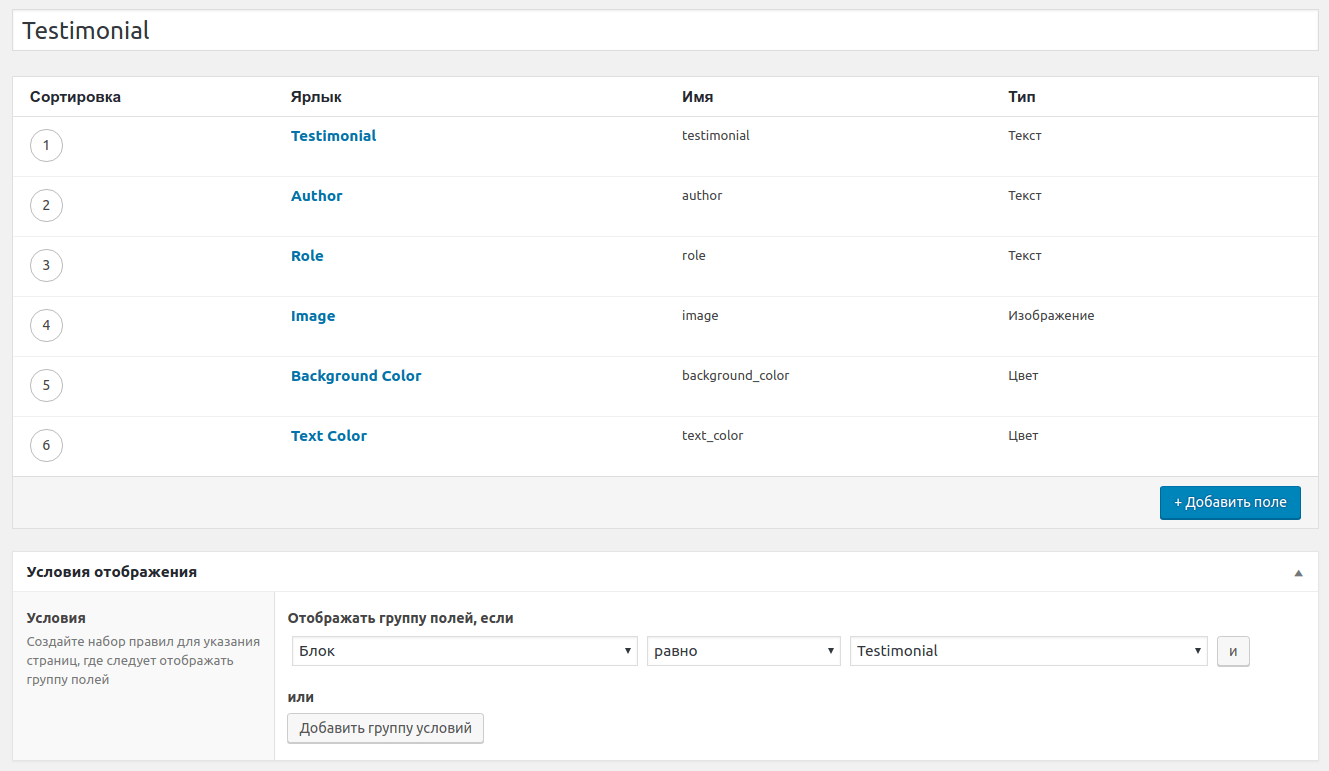
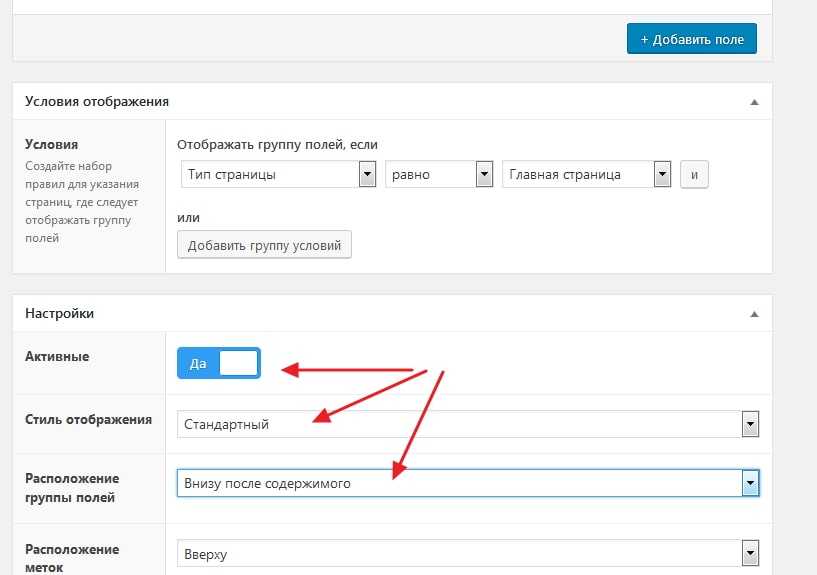
3. Как я говорил выше, на этой же странице есть блоки настроек Placement Rules и Extras. Полезнее всего первый, т.к. там создаются условия для вывода произвольных полей в WordPress админке.
![]()
Ограничения показа могут касаться:
- Post Types — типов записей (посты, страницы, товары);
- Post Formats — форматов постов (обычный, видео, цитата, ссылка);
- User Roles — пользовательских ролей (админ, автор, редактор);
- Posts — конкретных записей;
- Taxonomy Terms — терминов таксономии;
- Page Templates — шаблонов страниц.
В примере выше я использовал последний вариант, поскольку нужно было добавить произвольные поля в WordPress только для страницы контактов (она имела специальный шаблон). Теоретически можно было бы воспользоваться опцией Posts.
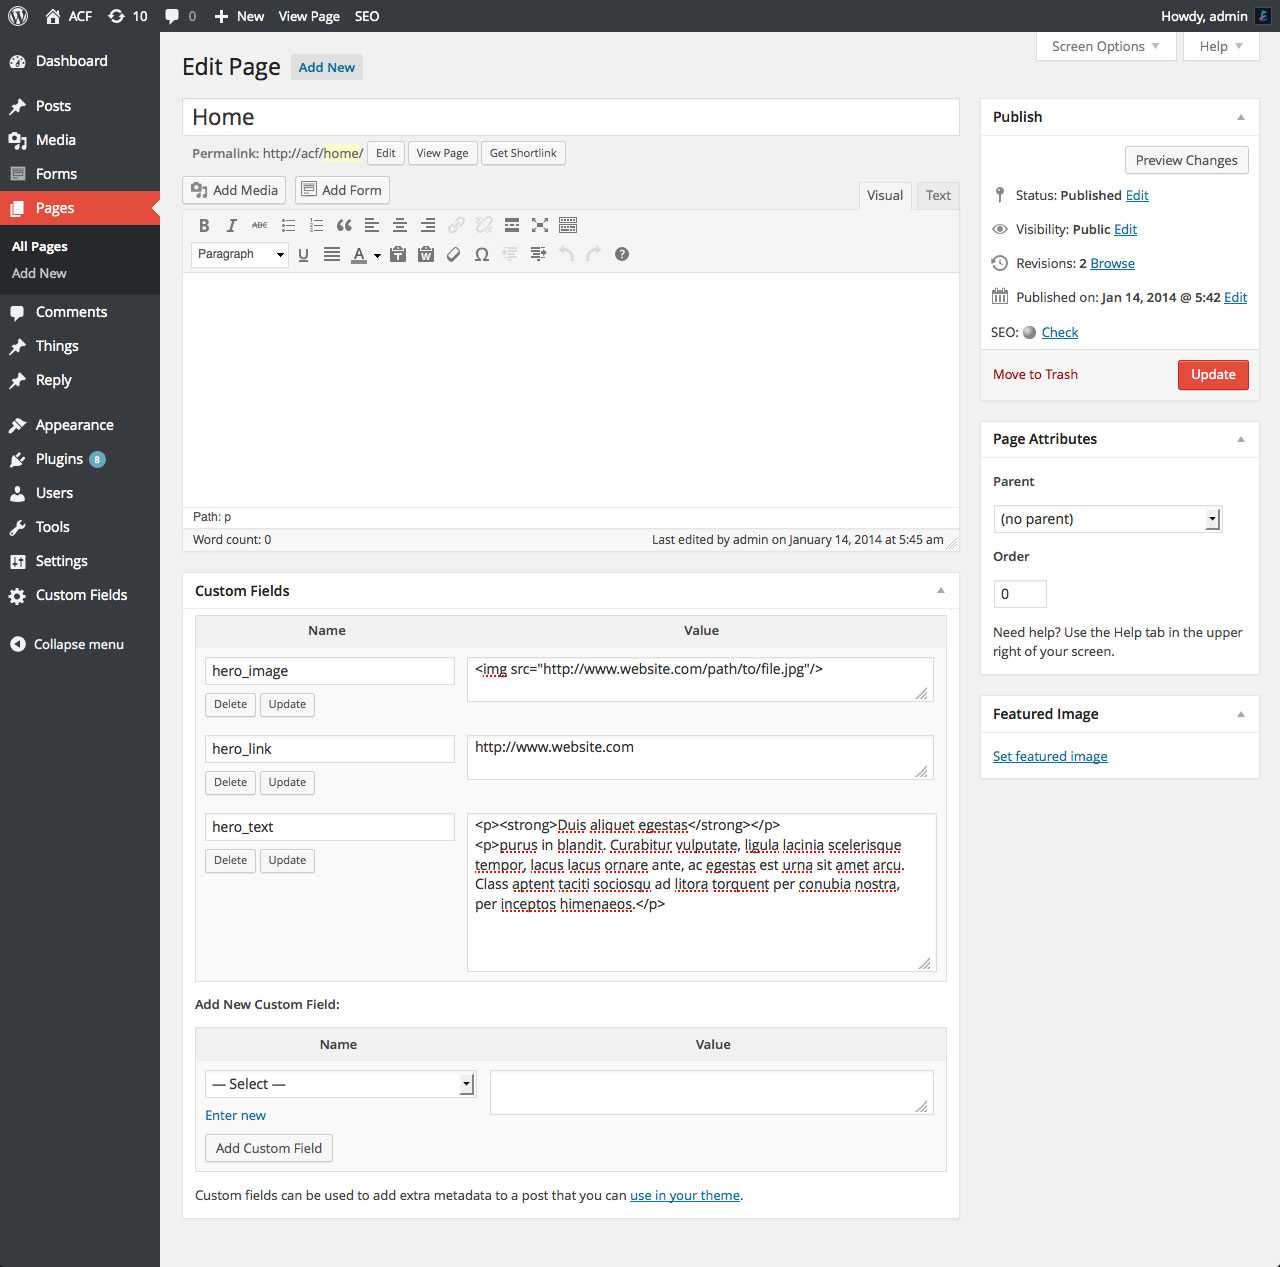
4. Финальная и самая основная стадия интеграции Custom Fields — вывод значений произвольных полей в WordPress файле шаблона. Для этого используется специальная функция get. Например:
echo CFS()->get( 'contacts_email' ); |
Считывание всех значений для текущей записи
$fields = CFS()->get(); |
echo CFS()->get( 'first_name', 71 ); |
Вариант с циклом для галереи:
$loop = CFS()->get( 'gallery' );
foreach ( $loop as $row ) {
    echo $row'gallery_title';
    echo $row'gallery_image';
}
|
Кстати, в моем случае результирующий код вывода произвольных полей выглядел следующим образом:
<div class="contacts"> <?php $contacts_item1 = CFS()->get( 'contacts_email' ); if( ! empty($contacts_item1) ) ?> <div class="contacts-item contacts__email"> <?php echo __( $contacts_item1 ,'newsite'); ?> </div><!-- .contacts-item --> <?php endif; ?> <?php $contacts_item3 = CFS()->get( 'contacts_phone' ); if( ! empty($contacts_item3) ) ?> <div class="contacts-item contacts__phone"> <?php echo __( $contacts_item3 , 'newsite'); ?> </div><!-- .contacts-item --> <?php endif; ?> </div> |
Здесь, во-первых, используется условный оператор «IF !empty» для проверки не пустое ли у нас поле, во-вторых, с помощью __() я вывожу значение произвольного поля с учетом выбранного языка сайта. Для локализации используется плагин qTranslate-X.
5. После завершения манипуляций по добавлению и выводу произвольных полей в WordPress вам нужно лишь зайти в админку на нужную страницу и заполнить соответствующие тексты/данные. После этого перейдите на сам сайт и проверьте все ли корректно отображается. Если нет, весь алгоритм по работе с плагином Custom Field Suite нужно будет тщательно проверить и повторить.
Configuring ACF integration
1. Install the free version of ACF (Advanced Custom Fields) plugin from wp-admin→Plugins→Add New→Search for Advanced Custom Fields plugin.
![]()
2. Activate the plugin after installation.
3. When you activate, you will be asked to select how you want it to work with WPUF.
![]()
- Compatible: If you select the Compatible button, it will only make upcoming fields compatible, but will not change the existing ones.
- Compatible & Migrate: If you select the Compatible & Migrate button, it will update both existing and upcoming custom fields and make it compatible with ACF.
- No Thanks: If you choose to forego during activation, you can later navigate to wp-admin→User Frontend→Settings→General Options. From here, scroll down to ACF Compatibility and select the option Yes to make WPUF custom fields data compatible with Advanced Custom Fields.
![]()
4. For this documentation purpose, we are selecting Compatibility & Migrate.
5. After activating ACF plugin, navigate to wp-admin→Custom Fields→Add New.
![]()
6. Set the name of the Field Group. And most importantly, select Post Type properly.
![]()
7. Click on Add Field to get started.
![]()
8. Now integrate the fields of your WPUF post form with ACF fields.
![]()
9. Enter the exact meta key of the field you are integrating into Field Name.
You will find the meta key in the Form Editor page of the Post Form you are integrating. Click on Edit on the custom field you are trying to integrate. You can now view the meta key on the right-hand-side of your screen.
![]()
6. Select the type of custom field from Field Type e.g. check-box, drop-down, radio button, multi-select, etc.
Make sure that you enter the Field Name and Field Type correctly.
7. Enter the exact values of the WPUF custom fields under Choices.
You can find the values when you click Edit on the custom field you are trying to integrate with ACF.
Enable the check-box Show Values to find the values of all the options.
![]()
Keep in mind to enter the Field Name (meta key), Field Type, and the Choices (values) correctly in order to properly integrate your WPUF form with ACF, as shown below:
![]()
Similarly, add the other custom fields of your WPUF form that you want to integrate with ACF plugin.
8. When you are done configuring the fields, click on Publish the Field Group.
![]()
9. You can add more fields if you want to even after publishing.
![]()
View after ACF Integration
After integration, you can now view the user’s submissions in ACF format:
![]()
Note: When the user submits a form from the frontend then they will be able to view the data from the custom field on the post/Custom post.
The integration would work the same way not just for existing fields, but also new ones. Create a new post form and work your way in the same way.
Admins can also change the choices from the dashboard by editing the user’s entry. And the user will be able to see the changed submissions from the frontend.


![]()
This completes the configuration for WPUF-ACF lite and Pro plugin integration.
![]()
Note: The repeater field of ACF pro is not compatible with WPUF.
Advanced Custom Fields tutorial: Have fun making your WordPress editor more user-friendly!
With Advanced Custom Fields, you can use WordPress in new and interesting ways. If you want to further extend your site, you can learn how to create custom post types and then add custom fields to those new post types.
Want to get started with Advanced Custom Fields on #WordPress? ️ beginner’s #tutorial
If you have any questions about our Advanced Custom Fields tutorial, let us know in the comments below!
* This post contains affiliate links, which means that if you click on one of the product links and then purchase the product, we’ll receive a commission. No worries though, you’ll still pay the standard amount so there’s no cost on your part.
Альтернативы Advanced Custom Fields
- Custom Field Suite — бесплатный, простой и легкий плагин, в котором «нечему ломаться». Поля выводятся с помощью PHP.
- CMB2 — бесплатный плагин. Метабоксы, кастомные поля и формы.
- Meta Box — бесплатный плагин, аналог ACF с 40 типами кастомных полей. Для работы требуется генерировать код в он-лайн генераторе. Инструкция.
- PODS — бесплатный плагин, который кроме кастомных полей создает кастомные типы страниц и таксономии. Создает страницы в админке WP для вывода настроек. Лучший бесплатный плагин для кастомных полей, страниц, таксономий и остального.
- Toolset — Платный и дорогой плагин. Кастомные поля, страницы и таксономии. Шаблоны, архивы, листинги, контроль доступа / мембершип, формы и карты.
- JetEngine — платный, но недорогой плагин. По функционалу превосходит предыдущий плагин, кроме мембершипа, который пока реализован в . Возможно, в будущем разработчики сделают полноценный мембершип. JetEngine cоздает Листинги, Кастомные типы постов, Кастомные типы контента, Кастомные таксономии, Страницы опций, Формы, Админку пользователей и многое другое. Один из флагманов CrocoBlock, постоянно развивается. Определенно стоит своих денег.
Скорее всего, вы хотите не только выводить кастомные поля, но и реализовать какой-то функционал, например, выбор автомобиля по параметрам и аренда.
Я рекомендую плагин JetEngine и вообще софт Crocoblock. У них есть готовые динамические шаблоны и другой готовый софт для реализации ваших идей.
Заключение
Как видите, даже бесплатная версия ACF предлагает большой функционал.
Если вы хотите выводить кастомные поля всего на нескольких страницах сайта, вы можете использовать шорткоды или использовать динамические теги в редакторе Elementor.
Если вы хотите выводить кастомные поля на многих страницах, например, на всех страницах Блога, используйте PHP или редактируйте шаблон страницы в Элементоре.
Используя дополнительные кастомные поля вы можете использовать WordPress не только в качестве блог-платформы, но и, например, создать сайт недвижимости.
Display our custom field on the product page
So before we start on the code, a word about where to put this. You should always put custom code in one of two places.
Use a child theme’s functions.php file
We have already prepared a child theme for Shoptimizer you can download and install.
A child theme is uploaded similar to any theme – within Appearance > Themes > Add New. You can add custom code within the functions.php of the child theme. A quick way to do this is within WordPress itself, within the Theme Editor. Appearance > Theme Editor.
Ensure that your child theme is selected and you’re not accidentally editing the parent theme.
Or, use the Code Snippets plugin
Another plugin you say? Well I like the Code Snippets plugin. We use it ourselves on CommerceGurus. It’s a great place to put custom code snippets which you can activate and deactivate whenever you like without any risk that you accidentally break your store.
Create the custom function
To output our new Author field on the single product page, you can use the following code.
PHP
add_action( ‘woocommerce_single_product_summary’, ‘shoptimizer_custom_author_field’, 3 );
function shoptimizer_custom_author_field() { ?>
<?php if(get_field(‘author’)) { ?>
<div class=»cg-author»><?php the_field(‘author’); ?></div>
<?php }
}
|
1 |
add_action(‘woocommerce_single_product_summary’,’shoptimizer_custom_author_field’,3); functionshoptimizer_custom_author_field(){?> <?phpif(get_field(‘author’)){?> <div class=»cg-author»><?phpthe_field(‘author’);?></div> <?php} } |
It’s fairly simple. Let’s look at this line by line.
PHP
add_action( ‘woocommerce_single_product_summary’, ‘shoptimizer_custom_author_field’, 3 );
| 1 | add_action(‘woocommerce_single_product_summary’,’shoptimizer_custom_author_field’,3); |
We’ve created a new function called shoptimizer_custom_author_field (you can name it anything) and are hooking it into the woocommerce_single_product_summary part of the single product page at position 3.
Where did we get this woocommerce_single_product_summary hook title?
There is an excellent visual guide from Business Bloomer to Single Product hooks which displays all the hooks you can use and what positions they currently occupy. Plus, you can read more about WooCommerce Hooks in our guide.
These are the standard WooCommerce hook positions used for the title, rating, price and introduction text. Note the numbers after each one, these designate the order of the elements.
PHP
add_action( ‘woocommerce_single_product_summary’, ‘woocommerce_template_single_title’, 5 );
add_action( ‘woocommerce_single_product_summary’, ‘woocommerce_template_single_rating’, 10 );
add_action( ‘woocommerce_single_product_summary’, ‘woocommerce_template_single_price’, 10 );
add_action( ‘woocommerce_single_product_summary’, ‘woocommerce_template_single_excerpt’, 20 );
|
1 |
add_action(‘woocommerce_single_product_summary’,’woocommerce_template_single_title’,5); add_action(‘woocommerce_single_product_summary’,’woocommerce_template_single_rating’,10); add_action(‘woocommerce_single_product_summary’,’woocommerce_template_single_price’,10); add_action(‘woocommerce_single_product_summary’,’woocommerce_template_single_excerpt’,20); |
So the title displays first, then the rating, then the price, then the excerpt text.
Because WooCommerce’s title is in position 5, I’ve made our author custom function position 3, so it will appear before the title.
If we wanted our author text to appear after the title? Yep, you guessed it, you can change the position number to any one of 6, 7, 8, or 9. These will all work.
Let’s look at the rest of the code:
PHP
function shoptimizer_custom_author_field() { ?>
<?php if(get_field(‘author’)) { ?>
<div class=»cg-author»><?php the_field(‘author’); ?></div>
<?php }
}
|
1 |
functionshoptimizer_custom_author_field(){?> <?phpif(get_field(‘author’)){?> <div class=»cg-author»><?phpthe_field(‘author’);?></div> <?php} } |
The rest of the function is a simple check to see to see if a field called author exists. Remember, we named this earlier.
If it finds the field it outputs it wrapped in a div which you can style with custom CSS if you wish.
The result looks like the screenshot below. Hurray!
![]()
Фильтр записей по произвольным полям
В WordPress есть очень хорошая функция «query_posts», которая, кроме всего прочего, имеет параметр для пользовательских полей. Таким образом, мы может использовать ее, чтобы создать своеобразный фильтр для отображения записей с определенным ключом / значением. Все, что вам нужно сделать, это вставить тег «query_posts» выше оператора цикла «loop».
Допустим, вы хотите сделать фильтр по всем статьям, чтобы отобразить только те, которые вы написали во время прослушивания музыки. Чтобы создать такой фильтр, вам нужно вставить следующий запрос перед началом цикла:
Благодаря этому коду, отображаться будут только определенные статьи, имеющие мета ключ «Песни», а остальные попадут под фильтр. Таким образом, вы можете создать новую страницу, вставить в нее данный код, и на ней будут находиться все записи, имеющие такой ключ.
А если, допустим, вы захотите настроить фильтр немного больше, чтобы отображать на странице только те посты, которые написали во время прослушивания трека определенного исполнителя. Тогда, вам нужно будет вставить в шаблон такой код:
https://youtube.com/watch?v=qILmxjVaU0o
Best ACF Alternatives
1. JetEngine
![]()
JetEngine is functionally one of the best ACF alternatives. However, you need to use Elementor to use JetEngine as it is designed specifically for Elementor. Not only you can use JetEngine to create custom fields but also other custom content types including custom post types, custom taxonomies, custom forms, listing items, dynamic calendar, dynamic gallery, and so on. JetEngine enriches the dynamic content types you can add to your Elementor designs. When creating custom fields group with JetEngine, you can use choose the following field types:
- Text
- Date
- Time
- Datetime
- Text area
- WYSIWYG
- Switcher
- Checkbox
- Icon picker
- Media
- Gallery
- Radio
- Repeater
- Select
- Number
- Color picker
You can assign the custom fields group to posts (blog posts), custom post types, pages, WooCommerce products, and so on.
You can use JetEngine whether on Elementor Pro or Elementor Free. The custom content type creation is done via the JetEngine backend. You can then add the custom content type you created to an Elementor design (page or template). In addition to allowing you to create a custom content type, JetEngine also allows you to add default dynamic content types of WordPress such as featured image, post title, post meta, author profile, site title, and so on. JetEngine itself is a paid plugin. It is part of JetPlugins, a set of premium Elementor add-ons developed by Crocoblock.
Download JetEngine
2. Pods
![]()
Looking for a free solution to create custom fields in WordPress? Pods can be the best answer. This plugin is completely free to use. You can use it to add custom fields to the WordPress default post types (posts and pages) and default taxonomies (categories and tags). Pods also allows you to create a custom post type and add custom fields group to it. Pods supports the following field types:
- Plain text
- Website
- Phone
- Password
- WYSIWYG
- Date
- Time
- Plain number
- Currency
- Media
- Relationship
- Color picker
Pods has a native integration support with Elementor that allows you to add the custom fields you created with Pods to an Elementor design. However, Elementor Pro version is required. If you use Beaver Builder, you can install the Pods Beaver Themer Add-On plugin (free) to integrate Pods with Beaver Builder.
3. Toolset
![]()
Toolset is a paid plugin. No free version is available. You can also use it as an alternative to ACF. You can use Toolset to create a dynamic website for your client or your own business. The types of custom content you can create with Toolset are vary depending on the plan you use. The cheapest plan ($69) allows you to create custom post types, custom fields, custom repeaters.
4. Custom Field Suite
Custom Field Suite is another great option if you are looking for a free plugin to create custom fields on your WordPress site. However, you need to have PHP knowledge to use it. You don’t need to deal with PHP scripts to create custom fields. But to implement your custom fields to a template, you need to write a PHP script. This plugin tends suited for WordPress developers with advanced skills, including coding. Custom Field Suite is a free plugin. The developer offers no technical support so you need to solve every issue yourself.
There are 14 field types offered by Custom Field Suite:
- Text
- Text area
- WYSIWYG
- Link
- Date
- Color picker
- True/false
- Select
- Relationship
- Term
- User
- File upload
- Loop
- Tab
You can assign the custom fields group to posts, pages, custom post types, and so on.
5. Meta Box
![]()
Meta Box is a freemium custom field plugin. If you use the free version, you can’t create the custom fields from your WordPress dashboard. Instead, you can only do so via a page provided by Meta Box. From this page, you can create the custom fields you need. Once done, you can generate the PHP code of custom fields group. The generated code is a new WordPress function which you can add by adding it to the functions.php file of your theme. The process is a bit hassle for the free version indeed. It’s even more hassle if you need to add a new field as you need to visit the Meta Box website to do so. Meta Box itself supports the following field types:
- Button
- Checkbox
- Checkbox List
- Hidden
- Number
- Password
- Radio
- Range
- Select
- Select Advanced
- Text
- Text Area
- URL
- Autocomplete
- Color Picker
- Date
- Date Time
- Fieldset Text
- Google Maps
- Image Select
- oEmbed
- Slider
- Text List
- Time
- WYSIWYG Editor
- Post
- Taxonomy
- Taxonomy Advanced
- User
- File
- File Advanced
- File Input
- Image
- Image Advanced
- Video
- Divider
- Heading
Meta Box is supported by major page builders like Elementor and Brizy. It supports extensions to extend its functionality.


Что умеет Advanced Custom Fields?
Вставка произвольных полей
Список всех его возможностей довольно велик, но в нем есть все самое необходимое, а именно:
- текст
- текстовая область
- номер
- пароль
- визуальный редактор WP
- загрузка изображений и файлов
- различные манипуляторы выбора
- различные взаимоотношения между объектами wp (рубрики, страницы, записи, пользователи)
- вставка Google карт
- выбор цвета и даты
Поля на любой вкус и цвет. А вот так это выглядит при редактировании самой записи.
Advanced Custom Fields в записи
Выбрать куда вставить поле
Вы можете вставить поля не только в запись, но и в другие виды таксономии, а именно:
- запись
- страница
- пользователь
- рубрики
- поля для определенного формата записи (что это?)
- прикрепление к определенному шаблону страницы
- и много другое
Настройка области редактирования записи
В этом плагине так же можно настроить, вывод других частей страницы редактирования. Например, можно отключить визуальный редактор, если на странице это не нужно. Или отключить стандартные произвольные поля wp, чтобы пользователь на них не отвлекался.
Также есть прочие настройки по-мелочи, вроде стиля самих настроек и приоритет полей по отношению к другим элементам.
Зачем нужны произвольные поля?
Стандартные настройки записи сильно ограничены. Вы можете использовать: заголовок, текст, миниатюру поста, вывести рубрики и остальное по мелочи. Но, к примеру, вам может понадобиться создать подобие социальной сети, где у каждого человека были бы свои параметры, такие как: рост, цвет глаз, цвет волос и т.д.
Пример социальной сети на движке WP
Стандартными средствами WP этого можно добиться, но это крайне неудобно. Обычному человеку сложно понять, как пользоваться этой штукой:
Стандартное произвольное поле WordPress
Хотелось бы понятные кнопочки загрузки и возможность выбрать рубрику. В итоге нам нужны дополнительные поля к стандартной записи и желательно чтобы были понятные людям. Как раз эту проблему и решает ACF.
Регистрация произвольных полей виджета
Устанавливаем плагин ACF, если он еще вдруг не установлен, и переходим в «Группы полей» ⟶ «Добавить»
В качестве примера возьмет три поля: текст, изображение и цвет, которым зальем фон виджета.
Сначала задаем условие, при которых будут выводиться новые поля. Выбираем «Виджет» и в выпадающем списке находим наш созданный тестовый виджет.
Условия отображения
Дальше как обычно добавляем поля:
- Текстовое поле — danilin_testwidget_text
- Изображение — danilin_testwidget_image
- Цвет — danilin_testwidget_color
В итоге должна получиться вот такая группа полей:
Группа полей тестового виджета
Что такое пользовательские поля WordPress
По словам разработчика, настраиваемые поля позволяют хранить дополнительную информацию, называемую «метаданными», используя пары ключ / значение. То есть пользовательские поля помогают вам хранить дополнительную информацию о части контента. Вы можете просто сохранить эту информацию для себя и показать ее в бэкэнд-редакторе или отобразить на веб-интерфейсе для ваших посетителей.
Предположим, что вы пишете обзор продукта и хотите присвоить ему звездный рейтинг в звездочках.
Без настраиваемых полей вам нужно записать эту информацию в текст блога, где вы просматриваете продукт. Но с пользовательскими полями можно создать отдельную область ввода, и там выбрать желаемый рейтинг.
Почему лучше использовать настраиваемое поле, чем просто записать что-то в текст записи? Потому что, с этими данными намного проще работать. Теперь вы можете:
- Позволить посетителям искать и фильтровать контент по рейтингу обзора.
- Быть уверенными, что рейтинг обзора отобразится в одном стиле.
- Легко обновлять рейтинг обзора.
- И многое другое.
Огромное количество плагинов, которые вы используете и любите, основаны на принципах пользовательских полей. Несколько примеров:
- Events plugin, который использует настраиваемые поля для хранения дат событий, цен и других данных.
- eCommerce plugin, использует настраиваемые поля для хранения цен на товары, деталей и т. д.
- Directory plugin, этот плагин использует настраиваемые поля для хранения информации о каждом элементе в вашем каталоге.
Можно использовать настраиваемые поля более простым способом, например, добавить некоторую дополнительную информацию в запись блога и отобразить:
- Место, из которого вы пишете пост (это было бы здорово для туристического блога).
- Альбом, который вы сейчас слушаете или книгу, которую читаете.
- Вес, который вы недавно подняли в тренажерном зале (отличная идея для фитнес-блога).
- И другие интересные возможности.
Настраиваемые поля являются большей частью того, что делает WordPress таким гибким, а понимание того, как их использовать, поможет вам создавать более уникальные, динамические сайты WordPress.
Шаг 3. Добавить функцию acf/save_post
Для работы формы, нужно добавить функцию в шаблон function.php
//Редактировать пост
function tsm_update_existing_post_data( $post_edit_id ) {
// Обновить существующий пост
$post_edit = array(
‘ID’ => $post_edit_id,
‘post_status’ => ‘private’,
‘post_title’ => wp_strip_all_tags($_POST), // Заголовок ACF field key
‘post_content’ => $_POST, // Содержание ACF field key
);
// Update the post
$post_edit_id = wp_insert_post( $post_edit );
// Изображение ACF field key
$image_edit = $_POST;
// Add the value which is the image ID to the _thumbnail_id meta data for the current post
update_post_meta( $post_edit_id, ‘_thumbnail_id’, $image_edit );
}
add_action( ‘acf/save_post’, ‘tsm_update_existing_post_data’, 10 );
add_action( ‘wp_print_styles’, ‘my_deregister_styles’, 100 );
function my_deregister_styles() {
wp_deregister_style( ‘wp-admin’ );
}
|
1 2 3 4 5 6 7 8 9 10 11 12 13 14 15 16 17 18 19 20 21 22 23 24 25 26 27 28 29 |
//Редактировать пост functiontsm_update_existing_post_data($post_edit_id){ // Обновить существующий пост $post_edit=array( ‘ID’=>$post_edit_id, ‘post_status’=>’private’, ‘post_title’=>wp_strip_all_tags($_POST’acf»field_54dfc93e35ec4’),// Заголовок ACF field key ‘post_content’=>$_POST’acf»field_5509d61f8541f’,// Содержание ACF field key ); // Update the post $post_edit_id=wp_insert_post($post_edit); $image_edit=$_POST’acf»field_55003d1d76fc1′; // Add the value which is the image ID to the _thumbnail_id meta data for the current post update_post_meta($post_edit_id,’_thumbnail_id’,$image_edit); } add_action(‘acf/save_post’,’tsm_update_existing_post_data’,10); add_action(‘wp_print_styles’,’my_deregister_styles’,100); functionmy_deregister_styles(){ wp_deregister_style(‘wp-admin’); } |
В коде нужно заменить ключи полей (Fields Key), если вы создавали поля самостоятельно. Если вы импортировали мой файл acf-export.rar ранее, тогда этого делать не нужно так как ключи совпадают.
Теперь зарегистрированные пользователи могут не только добавлять новые посты, но и редактировать их. И для этого не обязательно пускать их в админ-панель.
Что такое кастомные поля. Что с их помощью можно делать.
Кастомные (Произвольные) поля позволяют добавлять, хранить и выводить дополнительную информацию о вашем контенте.
Например, WooCommerce использует свои собственные кастомные поля для хранения дополнительной информации о Товарах:
- Цена
- Вес
- Цвет
- Размер
Если вы пользуетесь плагином событий, эти плагины используют кастомные поля для вывода информации:
- Место события
- Дата / Время начала
- Цена
Для сайта с недвижимостью вы можете выводить поля с типом недвижимости, арендой или продажей, количеством комнат, метражом, и так далее.
Для сайта о фильмах вы можете выводить информацию о режиссёре, студии, продолжительности, жанре фильма, и так далее.
Сайт аренды автомобилей выводит данные о типе кузова, объеме двигателя, типе трансмиссии и так далее.
Еще одна область применения плагина Advanced Custom Fields — на сайтах клиентов.
Например, вы сделали сайт, где на главной странице находится слайдер с несколькими строками текста.
Через некоторое время клиент хочет изменить текст в слайдере на какой-то другой. Чтобы он мог это сделать без вашей помощи, вы можете использовать кастомные поля.
![]()
Пример Банера / Слайдера на Главной
Добавьте кастомные поля в админке той страницы, на которой находится слайдер, а вывод полей — на слайдере.
Тогда клиент может изменить текст на слайдере в бэк-энде сайта без использования пейдж-билдера. И нажать на кнопку Обновить.
Или, например, изменить цвет шрифта или фон секции.
Еще более продвинутая идея — вынести всю кастомную информацию на отдельную страницу в админке, например, текст в слайдере, вопросы и ответ FAQ / ЧаВо, контактную информацию, и так далее.
В бесплатной версии ACF вы можете использовать такие типы кастомных полей:
Основное
- Текст
- Область текста
- Число
- Диапазон
- Ссылка
- Пароль
Выбор
- Выбор (select)
- Флажок (checkbox)
- Переключатель (radio)
- Группа кнопок
- Да / Нет
Отношение
- Ссылка
- Объект записи
- Ссылка на страницу
- Записи
- Таксономия
- Пользователь
jQuery
- Расположение на карте
- Дата
- Дата и время
- Время
- Цвет
Блок
- Сообщение
- Аккордеон
- Вкладка
- Группа
What Are WordPress Custom Fields?
In short, custom fields are a form of meta data that can be used to extend posts and pages.
In that, they are very similar to stuff like publishing date, author, category, tag and other data that’s common for many WordPress content types.
While that sounds a bit underwhelming, custom fields are actually the single most powerful feature for extending WordPress posts and pages.
You will soon see why.
Examples Of WordPress Custom Fields
So, basically, custom fields allow you to include additional information of any kind to your content.
While not spectacular in the abstract, it gets more exciting when you look at concrete examples of custom fields in action.
I already mentioned some use cases in the introduction. Metadata from custom fields can, for example, take the form of
- A scoring system to a movie post type
- Start and end times for events (like in the Event Organiser plugin)
- Prices for products or color variations and sizes
- Additional meta boxes in the WordPress editor like the content analysis tool in Yoast SEO
Yep, all of these are done with custom fields. Now do you start to see why this feature is so powerful?
Advantages Of WordPress Custom Fields
In theory, you can add a lot of this information to your content in other ways.
Movie scoring can, for example, be directly added to the post. If that is the case, what do you need custom fields for?
The advantage of using custom fields to add recurring data is that they make it easy to change things site wide.
For example, if you decided to move the movie scores to another location inside your posts, your can just do so for all reviews by changing one template.
If you saved the information inside the posts, you would have to edit every single one to implement the same change on your entire site.
Sounds a lot more complicated, doesn’t it?
Apart from that, using custom fields often makes for a much better user experience.
As you will see below, they allow you to include metafields in the WordPress editor and other places from where the filled-in information is automatically added to your finished content in the right place.
This makes things much more comfortable and, if you are developing websites for other people, professional looking.
What sounds better: Giving your client a customized admin interface that does exactly what they want or telling them to write everything into the post and format it by hand?
I rest my case.
How To Manually Add Custom Fields In WordPress
While this tutorial will teach you how to use the Advanced Custom Fields plugin, it should be said that you don’t necessarily need the plugin to take advantage of this WordPress feature.
That’s because the ability to add custom fields is natively built into WordPress (besides the possibility to code it manually that is).
As you will see later on, Advanced Custom Fields makes the process much easier, yet, for completion’s sake I will quickly show you the alternative way.
You might not be aware of it but there is actually a custom field metabox available in the WordPress editor. However, since version 3.1 it is hidden by default and you need to use the screen options at the top to see it.

![]()
After that, the box appears at the bottom of the editor screen.
![]()
Here, you can easily add any custom field you like. All you need to do is give it a name and a value.
For example, to let people know which music was in your headphones while writing your post, you can add a custom field called Currently Listening To: plus the tune that’s running at the moment.
![]()
(Is it Taylor Swift for you too? I don’t blame you.)
When you add this data, it will be saved in the database and can be output on your site.
The key (here: Currently Listening To:) will also be reusable in other posts in the future and can be picked from a drop-down menu.
Now all that’s left is adding some code to whichever template you want this field to show up in. We will dive into this topic in more detail below.
Когда использовать Кастомные Поля
Например, вы хотите опубликовать на сайте какое-то Мероприятие. Вы можете это сделать в виде простого текста в Статье или на Странице.
Если у вас только одно мероприятие, то можно и так, но если у вас много мероприятий, или сайт, посвященный каким-то мероприятиям, то лучше использовать кастомные поля.
Использовать кастомные поля лучше по нескольким причинам:
- Вы выносите ключевую информацию в отдельное место, где ее легко найти и редактировать
- Вы можете использовать одну и ту же информацию неограниченное количество раз
- Если вы захотите изменить стили вывода информации, вы можете это сделать в одном месте вместо изменений на каждой странице
- Если вы хотите использовать одну и ту же информацию на разных страницах, но с разными стилями. Например, секция FAQ / ЧаВо на странице FAQ и на странице Оформления заказа, у одной страницы черный фон, у другой — белый.
Если у вас на сайте десятки или сотни страниц с одинаковым выводом информации, лучше создать единый шаблон страницы и использовать Кастомные поля.
![]()
Сайт недвижимости — Кастомные поля
Количество ванных комнат, спален и гаражей — кастомные поля. Расположение — кастомное поле.


