
Маршруты и Эндпоинты
-
Маршрут (Route — роут) — это «имя», которое отсылает работу API к определенным эндпоинтам. Если упростить, то можно сказать, что маршрут — это URL к которому можно обратиться разными HTTP методами. Маршрут может иметь несколько эндпоинтов.
- Эндпоинт (Endpoint — конечная точка) — это само обращение к маршруту отдельным HTTP методом. Эндпоинт выполняют конкретную задачу, принимают параметры и возвращают данные Клиенту.
Разберем URL
:
- Здесь wp/v2/posts/123 — это маршрут, а /wp-json — это базовый путь самого REST API.
- Этот маршрут имеет 3 эндпоинта:
- — запускает метод get_item() и возвращает данные поста Клиенту.
- — запускает метод update_item(), обновляет данные и возвращает их Клиенту.
- — запускает метод delete_item(), удаляет пост и возвращает только что удаленные данные Клиенту.
Запрос к корневому маршруту
Если сделать GET запрос к корневому маршруту http://example.com/wp-json/, мы получим JSON ответ, в котором видно какие доступны маршруты, и какие доступны эндпоинты для каждого из них. При этом маршрут тут это (корень), а при GET запросе он становится эндпоинтом (конечной точкой).
Маршрут без ЧПУ
На сайтах без ЧПУ маршрут (с претворяющем слэшем) добавляется в URL как значение параметра rest_route. Например:
- — корневой маршрут.
- — получение поста 123.
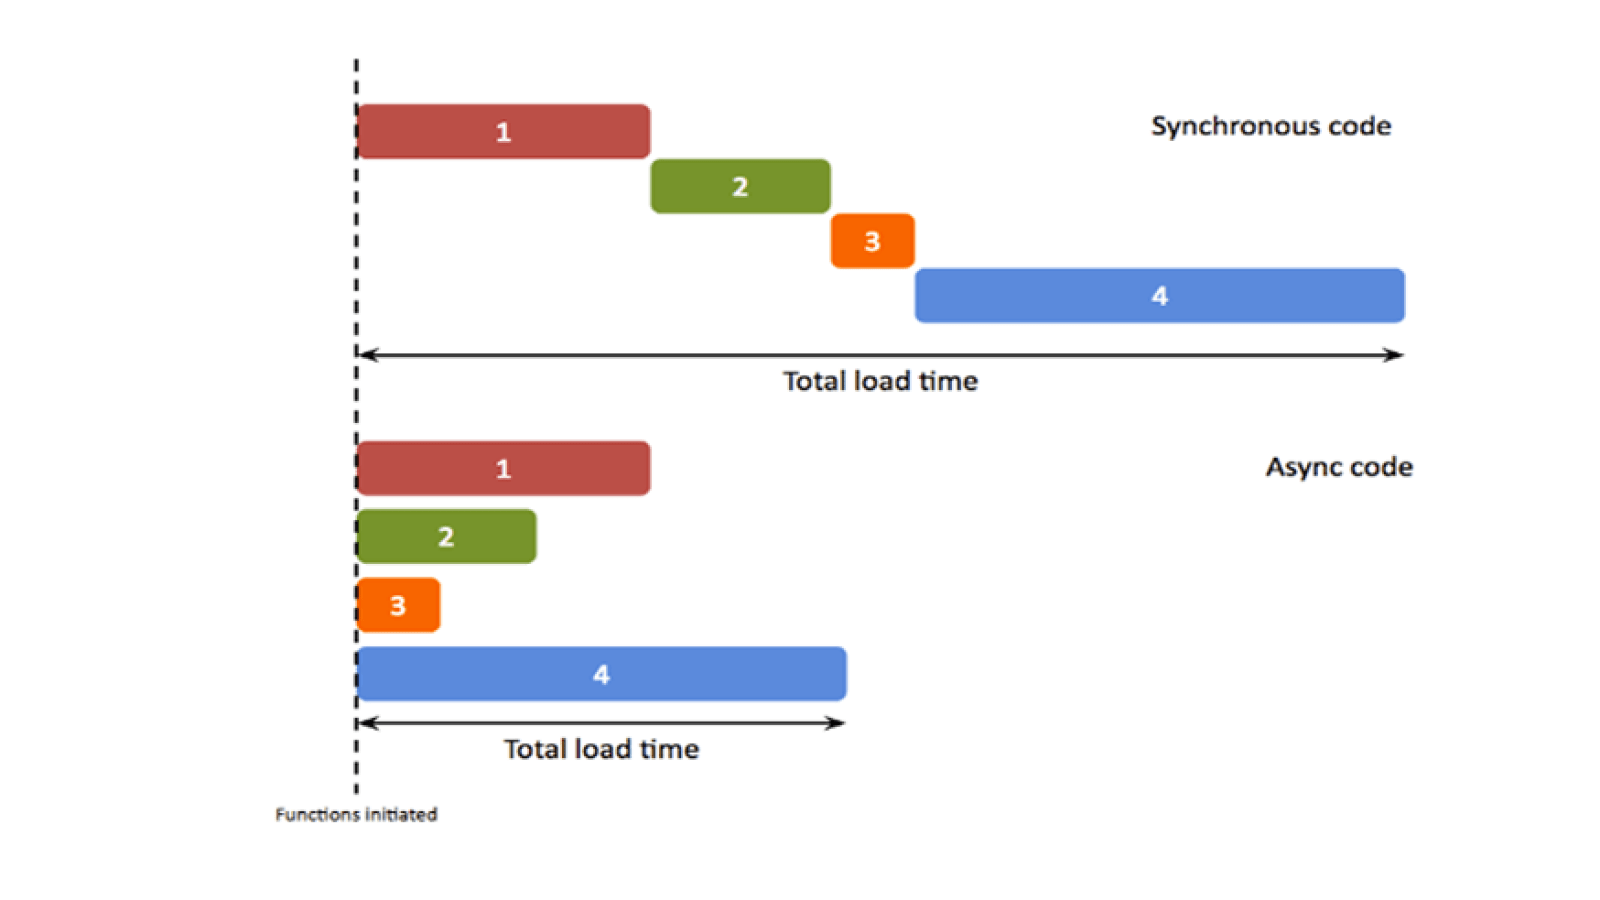
How to fetch data from a GraphQL API in React?
Last but not least, the article should shortly mention GraphQL APIs for React. How would you fetch data from a GraphQL API instead of a REST API (which you have used so far) from a React component? Basically it can be achieved the same way, because GraphQL is not opinionated about the network layer. Most GraphQL APIs are exposed over HTTP whether it is possible to query them with the native fetch API or axios too. If you are interested in how you would fetch data from a GraphQL API in React, head over to this article: A complete React with GraphQL Tutorial.
You can find the finished project in this GitHub repository. Do you have any other suggestions for data fetching in React? Please reach out to me. It would mean lots to me if you would share the article to others for learning about data fetching in React.
![]()
Every once in a while we need to test API requests. Axios is one of the most popular JavaScript libraries to fetch data from remote APIs . Hence, we will use Axios for our data fetching example…
How to Make a GET Request
To fetch data or retrieve it, make a GET request.
First, you’re going to make a request for individual posts. If you look at the endpoint, you are getting the first post from the endpoint:
To perform this request when the component mounts, you use the hook. This involves importing Axios, using the method to make a GET request to your endpoint, and using a callback to get back all of the response data.
The response is returned as an object. The data (which is in this case a post with , , and properties) is put in a piece of state called which is displayed in the component.
Note that you can always find the requested data from the property in the response.
React Native Example in Fetching Data
We are now going to retrieve data from a json file in a sample React Native project. The content of the json file can be found here: testAPI.json
The file contains a title, description and an array of articles. Each article has an id and title. We want to display the list of articles in our React Native app, along with its id. To do this we can follow the steps summarized below:
Steps to fetch data:
- Pass the URL to the fetch API. The URL will be the same as above that contains the testAPI.json file.
- Next we will parse the response object and extract the json response that is obtained.
- UI will display the data response.
- Catch any errors thrown from the fetch call.
The example is written as an expo snack that you can play with here and you can also run it on an iOS or Android simulator by clicking the code snippet below:
We are using a functional React component in our example. I want to fetch the data as soon as the component mounts, and the best place to fetch would be in the useEffect hook. I am using two state variables, isLoading and data. The data holds the json response from the API and the isLoading holds the status of the call.
Let’s analyze what is happening within the useEffect hook:
The useEffect hook is similar to the componentDidMount and componentDidUpdate in class components. Learn more about the useEffect hook from my previous article: Guide to Learn useEffect Hook in React
The fetch call is passed the URL, the response is then parsed. The setData is used to to set the state of the data which contains the response json. The data state can be used throughout the component. Errors are then handled. The finally block is executed after the call is complete, and it sets the isLoading state to false.
Render UI
Now the component parses the data and renders it using a FlatList component. The resulting UI is shown below:
You can see that our mobile app parses the JSON response and displays the articles list in the UI. When there is an error, it will log it to the console. And if the data is not loaded yet, we will display a “Loading..” message. Quite neat isn’t it?!
Fetching Data with Forms and React
What about a proper form to fetch data? So far, we have only a combination of input field and button. Once you introduce more input elements, you may want to wrap them with a form element. In addition, a form makes it possible to trigger the button with «Enter» on the keyboard too.
functionApp(){

...

return(

<Fragment>

<form

onSubmit={()=>

setUrl(`http://hn.algolia.com/api/v1/search?query=${query}`)

}

>

<input

type="text"

value={query}

onChange={event=>setQuery(event.target.value)}

/>

<buttontype="submit">Search</button>

</form>

{isError &&<div>Something went wrong ...</div>}

...

</Fragment>

);

}
But now the browser reloads when clicking the submit button, because that’s the native behavior of the browser when submitting a form. In order to prevent the default behavior, we can invoke a function on the React event. That’s how you do it in React class components too.


functionApp(){

...

return(

<Fragment>

<formonSubmit={event=>{

setUrl(`http://hn.algolia.com/api/v1/search?query=${query}`);

        event.preventDefault();

}}>

<input

type="text"

value={query}

onChange={event=>setQuery(event.target.value)}

/>

<buttontype="submit">Search</button>

</form>

{isError &&<div>Something went wrong ...</div>}

...

</Fragment>

);

}
Now the browser shouldn’t reload anymore when you click the submit button. It works as before, but this time with a form instead of the naive input field and button combination. You can press the «Enter» key on your keyboard too.
Error Handling with React Hooks
What about error handling for data fetching with a React hook? The error is just another state initialized with a state hook. Once there is an error state, the App component can render feedback for the user. When using async/await, it is common to use try/catch blocks for error handling. You can do it within the effect:
import React,{ Fragment, useState, useEffect }from'react';

import axios from'axios';

functionApp(){

constdata, setData=useState({ hits});

constquery, setQuery=useState('redux');

consturl, setUrl=useState(

'https://hn.algolia.com/api/v1/search?query=redux',

);

constisLoading, setIsLoading=useState(false);

constisError, setIsError=useState(false);

useEffect(()=>{

constfetchData=async()=>{

setIsError(false);

setIsLoading(true);

try{

const result =awaitaxios(url);

setData(result.data);

}catch(error){

setIsError(true);

}

setIsLoading(false);

};

fetchData();

},url);

return(

<Fragment>

<input

type="text"

value={query}

onChange={event=>setQuery(event.target.value)}

/>

<button

type="button"

onClick={()=>

setUrl(`http://hn.algolia.com/api/v1/search?query=${query}`)

}

>
        Search
</button>

{isError &&<div>Something went wrong ...</div>}

{isLoading ?(

<div>...</div>

)(

<ul>

{data.hits.map(item=>(

<likey={item.objectID}>

<ahref={item.url}>{item.title}</a>

</li>

))}

</ul>

)}

</Fragment>

);

}

exportdefault App;
The error state is reset every time the hook runs again. That’s useful because after a failed request the user may want to try it again which should reset the error. In order to enforce an error yourself, you can alter the URL into something invalid. Then check whether the error message shows up.
Data fetching using Higher-Order Components (HOC)
If you want to separate code and data fetching into 2 different components, you can do so by extracting data fetching into an HOC:
withFetching.js
1import axios from"axios"

2import React,{ useEffect, useState }from"react"

3

4constwithFetching=url=>Component=>{

5return()=>{

6constusers, setUsers=useState()

7consterror, setError=useState("")

8constisLoading, setIsLoading=useState(false)

9

10constfetchData=()=>{

11setIsLoading(true)

12      axios

13.get(url)

14.then(response=>{

15setUsers(response.data)

16setIsLoading(false)

17})

18.catch(error=>{

19setError("Sorry, something went wrong")

20setIsLoading(false)

21})

22}

23

24useEffect(()=>{

25fetchData()

26},)

27

28return<Componentusers={users}error={error}isLoading={isLoading}/>

29}

30}

31

32exportdefault withFetching
Now use the HOC created above while exporting the component:
1import React from"react"

2import withFetching from"./withFetching"

3const url ="https://jsonplaceholder.typicode.com/users"

4

5constUsingHoc=({ isLoading, error, users })=>{

6if(isLoading){

7return<div>..</div>

8}

9if(error){

10return<div>{error}</div>

11}

12return(

13<div>

14{users.length >&&(

15<ul>

16{users.map(user=>(

17<likey={user.id}>{user.name}</li>

18))}

19</ul>

20)}

21</div>

22)

23}

24

25exportdefaultwithFetching(url)(UsingHoc)
Настройка
Подразумевает установку значений по умолчанию для большинства запросов, таких как базовый URL и шаблоны запросов(роутер). У вас будет либо единственный ресурс по умолчанию, либо список ресурсов, которые затем необходимо передать в конструктор класса. Конфигурирование URL запросов полностью вынесено в настройки именно для удобства и простоты использования. Хотя писать полные или относительные URL запросов в методах вам никто не запрещает.
import Api from 'axios-rest-api';

const resources = ;

resources.default = {
  host: 'http://127.0.0.1',
  prefix: 'api',
};

resources.users = {
  routing: {
    cget: 'popular',
  },
};

var api = new Api(resources);
api.res('users').load(); // GET http://127.0.0.1/api/users
api.res('users').cget(); // GET http://127.0.0.1/api/users/popular
api.res('users').get({id: 1}); // GET http://127.0.0.1/api/users/1
// Resource config
resources.some = {
  host: 'http://127.0.0.1',
  prefix: 'api',
  version: 'v2',
  postfix: '',
  authorized: false,
  key: 'someAuthKey',
  delay: 3,
  routing: {
    route: '',
    get: '{id}',
    cget: '',
    post: '',
    delete: '{id}',
    put: '{id}',
    patch: '{id}',
    option: '{id}',
    load: '',
    send: '',
    new: 'new',
    save: 'save',
    edit: 'edit/{id}',
    remove: 'remove/{id}',
  },
}
URL формируется следующим образом
- prefix: ‘api’ — не обязательно
- version: ‘v2’ — не обязательно
- postfix: ‘some’ — не обязательно
Итого и дальше в соответствии с конфигом ресурса. Нельзя указать для всех ресурсов конкретного сервера АПИ в конфигурации. Для сервера можно указать или . Возможность явно указать существует только в контексте конкретного ресурса.
Ресурсы
Основа запросов заключается в получении ресурсов с единственного или нескольких серверов. Метод устанавливает имя ресурса или адрес его нахождения. Далее имя ресурса сопоставляется со списком сконфигурированных ресурсов для настройки конкретного запроса, если это необходимо. При остсуствии специфических настроек ресурса берется конфигурация по умолчанию, а при её отсутствии, запрос сформируется по общепринятым правилам. Метод возвращает сконфигурированный экземпляр класса для дальнейшей работы с ресурсом.
Имя ресурса используется для подстановки в итоговый URL запроса как есть. Поэтому вы можете не заморачиваться с настройкой роутов, а просто вызывать ресурс с сервера по относительному адресу
resources.default = {
  host: 'http://127.0.0.1',
  prefix: 'api',
};

var api = new Api(resources);
api.res('users/new').post({name: 'Bob'});
// POST http://127.0.0.1/api/users/new
// send data: {name: 'Bob'}
Параметры запросов
Библиотека меняет порядок параметров в методе запросов(например get или post), и в отличии от Axios значению url отводится наименьший приоритет. URL либо не указывается вообще либо указывается самым последним параметром. На первое место выводятся либо данные для POST запроса, либо параметры URL для GET запросов.
resoures. = {
  host: 'https://www.google.com',
  routing: {
    get: 'search',
  },
};

var api = new Api(resoures);
api.res('google').load({q: 123, hl: 'ru'});
// GET https://www.google.com/search?q=123&hl=ru
Custom Data Fetching Hook
In order to extract a custom hook for data fetching, move everything that belongs to the data fetching, except for the query state that belongs to the input field, but including the loading indicator and error handling, to its own function. Also make sure you return all the necessary variables from the function that are used in the App component.
constuseHackerNewsApi=()=>{

constdata, setData=useState({ hits});

consturl, setUrl=useState(

'https://hn.algolia.com/api/v1/search?query=redux',

);

constisLoading, setIsLoading=useState(false);

constisError, setIsError=useState(false);

useEffect(()=>{

constfetchData=async()=>{

setIsError(false);

setIsLoading(true);

try{

const result =awaitaxios(url);

setData(result.data);

}catch(error){

setIsError(true);

}

setIsLoading(false);

};

fetchData();

},url);

return{ data, isLoading, isError }, setUrl;

}
Now, your new hook can be used in the App component again:
functionApp(){

constquery, setQuery=useState('redux');

const{ data, isLoading, isError }, doFetch=useHackerNewsApi();

return(

<Fragment>

<formonSubmit={event=>{

doFetch(`http://hn.algolia.com/api/v1/search?query=${query}`);

        event.preventDefault();

}}>

<input

type="text"

value={query}

onChange={event=>setQuery(event.target.value)}

/>

<buttontype="submit">Search</button>

</form>

...

</Fragment>

);

}
The initial state can be made generic too. Pass it simply to the new custom hook:
import React,{ Fragment, useState, useEffect }from'react';

import axios from'axios';

constuseDataApi=(initialUrl, initialData)=>{

constdata, setData=useState(initialData);

consturl, setUrl=useState(initialUrl);

constisLoading, setIsLoading=useState(false);

constisError, setIsError=useState(false);

useEffect(()=>{

constfetchData=async()=>{

setIsError(false);

setIsLoading(true);

try{

const result =awaitaxios(url);

setData(result.data);

}catch(error){

setIsError(true);

}

setIsLoading(false);

};

fetchData();

},url);

return{ data, isLoading, isError }, setUrl;

};

functionApp(){

constquery, setQuery=useState('redux');

const{ data, isLoading, isError }, doFetch=useDataApi(

'https://hn.algolia.com/api/v1/search?query=redux',

{ hits},

);

return(

<Fragment>

<form

onSubmit={event=>{

doFetch(

`http://hn.algolia.com/api/v1/search?query=${query}`,

);

          event.preventDefault();

}}

>

<input

type="text"

value={query}

onChange={event=>setQuery(event.target.value)}

/>

<buttontype="submit">Search</button>

</form>

{isError &&<div>Something went wrong ...</div>}

{isLoading ?(

<div>...</div>

)(

<ul>

{data.hits.map(item=>(

<likey={item.objectID}>

<ahref={item.url}>{item.title}</a>

</li>

))}

</ul>

)}

</Fragment>

);

}

exportdefault App;
That’s it for the data fetching with a custom hook. The hook itself doesn’t know anything about the API. It receives all parameters from the outside and only manages necessary states such as the data, loading and error state. It executes the request and returns the data to the component using it as custom data fetching hook.
Имена полей: snake_case или camelCase?#
Если вы используете JSON (JavaScript Object Notation) в качестве основного формата представления, «правильно» будет следовать принципам наименования, принятым в JS. А это значит, что в именах полей нужно использовать camelCase! Если потом вы будете создавать клиентские библиотеки на разных языках программирования, следует придерживаться принятого в них идиоматического стиля. А это значит, что в C# и Java названия пишутся регистром camelCase, а в python и ruby используется snake_case.
Пища для размышлений: я всегда считал, что snake_case легче читать, чем принятый в JavaScript camelCase. Однако до недавнего времени у меня не было никаких доказательств, подтверждающих мои впечатления. Однако в 2010 году провели исследование, в котором отслеживалось движение глаз при чтении camelCase и snake_case (PDF). И выяснилось, что snake_case читается на 20% легче, чем camelCase! А от удобочитаемости зависят удобство поиска по API и восприятие примеров в документации.
Во многих популярных JSON API используется snake_case. Подозреваю, что это происходит потому, что библиотеки сериализации следуют правилам наименования используемого ими языка. Возможно, нужно, чтобы библиотеки сериализации JSON учитывали изменения правил наименования.
Web APIs
RapidAPI is a platform for accessing web-based APIs.
The most popular type of web API is a Representational state transfer API or RESTful API for short. To be brief, it follows an architecture that uses predefined and stateless operations to access web resources.
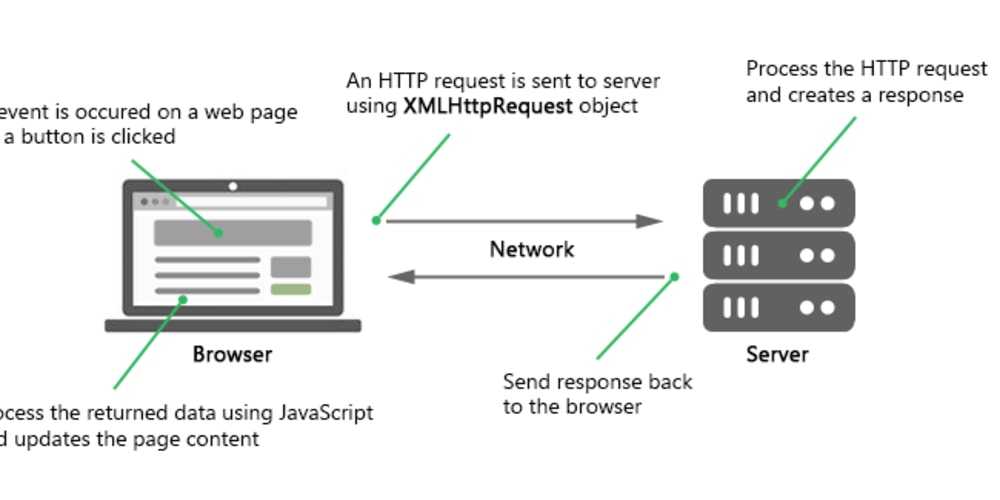
Using web APIs requires the use of HTTP requests. Different types of requests include GET, POST, DELETE, PATCH, etc. If you have written some code and it needs to communicate with code somewhere else, it will send an HTTP request over the internet. Next, let’s discuss the HTTP request types just mentioned. You will notice that the types are matched to verbs that are similar to their function:
- GET: Used to request data from an endpoint
- POST: Sends data to an endpoint
- DELETE: Remove data from an endpoint.
- PATCH: Update a record or data value at an endpoint.
These types of interactions are external from the local environment, and therefore, the APIs that are providing the data or services are called external APIs. It is difficult to fathom how useful it is to have the capability to access external APIs for various data and services.
JSX
JSX looks like an HTML templating language but is more powerful. We already saw how JSX can embed data into a view using curly brackets during our previous example. It looks very similar to HTML but has many differences. A few are:
- passing custom props as attributes on an element tag
- Instead of assigning CSS classes with , JSX uses . Camel casing is used for event listeners as well (I.e ).
- closing tags are different depending on the elements. Below are a few examples.
HTML input and image tags:
JSX input, and image tags:
In addition to the above subtle changes, JSX tags can be self-closing. A valid JSX element could be.


You can learn more about JSX on React’s documentation page.
Добавление данных с помощью GET-запроса
Вы можете использовать библиотеку Axios непосредственно в своих компонентах для извлечения данных из метода или хука жизненного цикла:
<template>
  <div>
    <ul v-if="posts && posts.length">
      <li v-for="post of posts">
        <p><strong>`post`.`title`</strong></p>
        <p>`post`.`body`</p>
      </li>
    </ul>

    <ul v-if="errors && errors.length">
      <li v-for="error of errors">
        `error`.`message`
      </li>
    </ul>
  </div>
</template>

<script>
import axios from 'axios';

export default {
  data() {
    return {
      posts: [],
      errors: []
    }
  },

  // Извлекает сообщения при создании компонента.
  created() {
    axios.get(`http://jsonplaceholder.typicode.com/posts`)
    .then(response => {
      // Ответы JSON обрабатываются автоматически.
      this.posts = response.data
    })
    .catch(e => {
      this.errors.push(e)
    })
  }
}
</script>
Версия этого кода с async/await будет выглядеть так:
<!-- ... template code ... -->

<script>
import axios from 'axios';

export default {
  data() {
    return {
      posts: [],
      errors: []
    }
  },

  // Извлекает сообщения при создании компонента.
  async created() {
    try {
      const response = await axios.get(`http://jsonplaceholder.typicode.com/posts`)
      this.posts = response.data
    } catch (e) {
      this.errors.push(e)
    }
  }
}
</script>
Этот код извлекает “posts” из JSONPlaceholder и заполняет неупорядоченный список извлеченными данными. Любые обнаруженные ошибки будут отображаться в отдельном неупорядоченном списке.
А теперь давайте посмотрим, как выполнить запроса POST с помощью axios.post().
6 — React List Employee Component
In this section, we will create a new folder called components inside the src folder. Then create a new file called ListUserComponent.jsx. Within this file create a React class component named ListUserComponent with following content:
import React, { Component } from 'react'
import EmployeeService from '../services/EmployeeService'

class ListEmployeeComponent extends Component {
    constructor(props) {
        super(props)

        this.state = {
                employees:
        }
        this.addEmployee = this.addEmployee.bind(this);
        this.editEmployee = this.editEmployee.bind(this);
        this.deleteEmployee = this.deleteEmployee.bind(this);
    }

    deleteEmployee(id){
        EmployeeService.deleteEmployee(id).then( res => {
            this.setState({employees: this.state.employees.filter(employee => employee.id !== id)});
        });
    }
    viewEmployee(id){
        this.props.history.push(`/view-employee/${id}`);
    }
    editEmployee(id){
        this.props.history.push(`/add-employee/${id}`);
    }

    componentDidMount(){
        EmployeeService.getEmployees().then((res) => {
            this.setState({ employees: res.data});
        });
    }

    addEmployee(){
        this.props.history.push('/add-employee/_add');
    }

    render() {
        return (
            <div>
                 <h2 className="text-center">Employees List</h2>
                 <div className = "row">
                    <button className="btn btn-primary" onClick={this.addEmployee}> Add Employee</button>
                 </div>
                 <br></br>
                 <div className = "row">
                        <table className = "table table-striped table-bordered">

                            <thead>
                                <tr>
                                    <th> Employee First Name</th>
                                    <th> Employee Last Name</th>
                                    <th> Employee Email Id</th>
                                    <th> Actions</th>
                                </tr>
                            </thead>
                            <tbody>
                                {
                                    this.state.employees.map(
                                        employee =>
                                        <tr key = {employee.id}>
                                             <td> { employee.firstName} </td>
                                             <td> {employee.lastName}</td>
                                             <td> {employee.emailId}</td>
                                             <td>
                                                 <button onClick={ () => this.editEmployee(employee.id)} className="btn btn-info">Update </button>
                                                 <button style={{marginLeft: "10px"}} onClick={ () => this.deleteEmployee(employee.id)} className="btn btn-danger">Delete </button>
                                                 <button style={{marginLeft: "10px"}} onClick={ () => this.viewEmployee(employee.id)} className="btn btn-info">View </button>
                                             </td>
                                        </tr>
                                    )
                                }
                            </tbody>
                        </table>

                 </div>

            </div>
        )
    }
}

export default ListEmployeeComponent
Let’s understand the above code.
The componentDidMount() is executed when the component is mounted for the first time. In the implementation, it actually invokes the service class method to fetch the employees from an API call and populates the state variable employees:
    componentDidMount(){
        EmployeeService.getEmployees().then((res) => {
            this.setState({ employees: res.data});
        });
    }
We are using the ES6 feature that is map operator to loop over our employees list and create the view:
<tbody>
                                {
                                    this.state.employees.map(
                                        employee =>
                                        <tr key = {employee.id}>
                                             <td> { employee.firstName} </td>
                                             <td> {employee.lastName}</td>
                                             <td> {employee.emailId}</td>
                                             <td>
                                                 <button onClick={ () => this.editEmployee(employee.id)} className="btn btn-info">Update </button>
                                                 <button style={{marginLeft: "10px"}} onClick={ () => this.deleteEmployee(employee.id)} className="btn btn-danger">Delete </button>
                                                 <button style={{marginLeft: "10px"}} onClick={ () => this.viewEmployee(employee.id)} className="btn btn-info">View </button>
                                             </td>
                                        </tr>
                                    )
                                }
                            </tbody>
The constructor() is invoked before the component is mounted. In the constructor, we have declared our state variables and bind the different methods so that they are accessible from the state inside of the render() method.
    constructor(props) {
        super(props)

        this.state = {
                employees:
        }
        this.addEmployee = this.addEmployee.bind(this);
        this.editEmployee = this.editEmployee.bind(this);
        this.deleteEmployee = this.deleteEmployee.bind(this);
    }
On the click of the Delete button, we use filter() method of an array to filter out the deleted employee:
    deleteEmployee(id){
        EmployeeService.deleteEmployee(id).then( res => {
            this.setState({employees: this.state.employees.filter(employee => employee.id !== id)});
        });
    }
On the click of the Update button, we will navigate to the Update Employee page using the following code:
    editEmployee(id){
        this.props.history.push(`/add-employee/${id}`);
    }
On the click of the View button, we will navigate to View Employee page using the following code:
    viewEmployee(id){
        this.props.history.push(`/view-employee/${id}`);
    }
On the click of the Add Employee button, we will navigate to Add Employee page using the following code:
Отправка данных с помощью POST-запроса
Вы можете использовать Axios для отправки запросов POST, PUT, PATCH и DELETE.
Примечание: Запросы не нужно отправлять при каждом событии ввода. Рассмотрите возможность использования дросселирования или противодействия.
<template>
  <div>
    <input type="text" v-model="postBody" @change="postPost()" />
    <ul v-if="errors && errors.length">
      <li v-for="error of errors">
        `error`.`message`
      </li>
    </ul>
  </div>
</template>

<script>
import axios from 'axios';

export default {
  data() {
    return {
      postBody: '',
      errors: []
    }
  },

  methods: {
    // при вызове загружает заметки на сервер.
    postPost() {
      axios.post(`http://jsonplaceholder.typicode.com/posts`, {
        body: this.postBody
      })
      .then(response => {})
      .catch(e => {
        this.errors.push(e)
      })
    }
  }
}
</script>
Версия кода с async/await выглядит так:
<!-- ... template code ... -->

<script>
import axios from 'axios';

export default {
  data() {
    return {
      postBody: '',
      errors: []
    }
  },

  methods: {
    // при вызове загружает заметки на сервер.
    async postPost() {
      try {
        await axios.post(`http://jsonplaceholder.typicode.com/posts`, {
          body: this.postBody
        })
      } catch (e) {
        this.errors.push(e)
      }
    }
  }
}
</script>
Этот код создает поле ввода, которое будет отправлять данные в JSONPlaceholder. Любые обнаруженные ошибки собираются в отдельный неупорядоченный список.
Давайте теперь попробуем использовать axios.create() для создания базового экземпляра.
Sending GET requests in React using Axios
Sending HTTP Get requests is even easier when using axios.
All we need to do is to call the axios.get method and provide the URL of the endpoint.
async getDataAxios(){
    const response =
      await axios.get("https://dog.ceo/api/breeds/list/all")
    console.log(response.data)
}
This code does the same as the code above in 2 lines! In fact, it is even more as it is automatically parsing the JSON response for us.
URL parameter
To send a request with URL parameters, we can do so by passing them to the get method in a config object:
async getDataAxios(){
    const response =
      await axios.get("https://dog.ceo/api/breeds/list/all",
          { params: {name: 'bruno'}}
      )
    console.log(response.data)
}
This results in a request to the following URL: «https://dog.ceo/api/breeds/list/all?name=bruno».
Adding HTTP headers
Depending on your situation, you might need to add certain headers to your request. With axios, this task is quite easy. All we need to do is to add a headers section to the config object:
async getDataAxios(){
    const response =
      await axios.get("https://dog.ceo/api/breeds/list/all",
        { headers: {'Content-Type': 'application/json'}}
      )
    console.log(response.data)
}
![]()
Фильтрация результатов, сортировка и поиск#
Старайтесь, чтобы URL-адреса базовых ресурсов были как можно более лаконичными. Сложные фильтры, требования к сортировке и расширенный поиск (если он ограничен одним типом ресурса) могут быть легко реализованы как параметры запроса поверх основного URL. Давайте рассмотрим подробнее:


Фильтрация: Используйте уникальный параметр запроса для каждого поля, которое осуществляют фильтрацию. Например, при запросе списка тикетов из точки входа вы можете ограничить поиск только тикетами в открытом состоянии. Это можно осуществить с помощью вот такого запроса: . Здесь state — это параметр запроса, по которому осуществляется фильтрация.
Сортировка: По аналогии с фильтрацией для описания правил сортировки можно использовать универсальный параметр sort. Чтобы установить несколько условий для сортировки, сделайте так, чтобы параметр сортировки принимал список полей, перечисленных через запятую. Перед наименованием параметра можно вставить символ «минус», чтобы сортировка производилась по убыванию. Давайте рассмотрим несколько примеров:
- — Получить список тикетов в порядке убывания приоритета;
- — Получить список тикетов в порядке убывания приоритета. В рамках определенного приоритета сначала показываются старые тикеты.
Поиск: Иногда базовых фильтров недостаточно, и вам нужна вся мощь полнотекстового поиска. Возможно, вы уже используете ElasticSearch или другую технологию поиска на основе Lucene. Когда полнотекстовый поиск используется, чтобы получить ресурсы определенного типа, он может отображаться в API в качестве параметра запроса на точке входа ресурса. Допустим, . Поисковые запросы должны направляться прямо в поисковик, и результаты поиска в API должны отображаться как обычный список.
Объединив всё вместе, мы можем строить запросы так:
- — Получить недавно обновленные тикеты;
- — Получить недавно закрытые тикеты;
- — Извлечь открытые тикеты с наивысшим приоритетом, в которых упоминается слово «return».
Псевдонимы для часто используемых запросов. Чтобы сделать работу в API более приятной для среднего пользователя, организуйте наборы условий поиска в простые пути REST. Например, запрос недавно закрытых тикетов можно оформить так:
Consuming REST APIs Using Axios
Instead of fetch(), you can consume APIs with Axios. Like fetch(), Axios allows you to make requests to an API endpoint. However, there are several differences between the two.
- Axios automatically returns the response in JSON while you have to convert it to JSON when using the Fetch API.
- Axios requires only one .then() callback unlike the Fetch API.
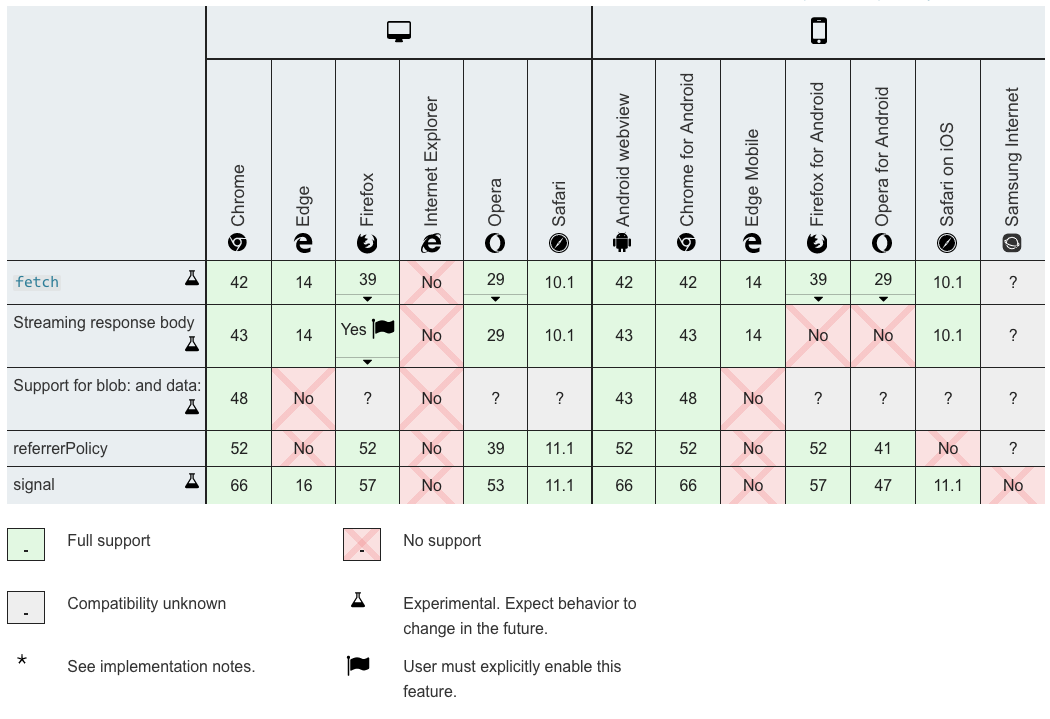
- Axios is compatible with major browsers while Fetch is only supported in Chrome 42+, Edge 14 +, Firefox 39+, and Safari 10+
Implementing Axios
Install Axios by running the following command.
After the installation is completed, import the Axios package into your app component and modify the fetchFact() function to use it.
That’s it! Your application should be displaying a random cat fact when it loads in the browser and when you click the button.


